

|
|
Table of ContentsConnecting to the 24/7 Data Acquisition Module Converter Noise and Effective Resolution Other Sources of Noise and Offset Error Tips For Measuring Small Voltages Addressing the 24/7 WildCard Using Module Select Jumpers Initializing the 24/7 Data Acquisition Wildcard Specifying the Reference Voltage Calibration Options Single- and Multi-Channel Sampling Continuous Sampling from a Single Channel |
24/7 Data Acquisition Wildcard Users GuideStarting a ConversionAfter you initialize the 24/7 Data Acquisition Wildcard and specify the reference voltage, you can calibrate, configure, and start converting samples using Start_Conversion. An alternative routine, Start_Conv_With_Values, allows you to forgo the calibration process and use already determined calibration coefficients instead. Each of these routines are discussed in turn. Calibrating and Starting a ConversionTo use any of the channels listed in Table 1, the channel must first be calibrated. You should also perform a calibration whenever the temperature or supply voltage changes significantly, or whenever you change the gain, sample frequency, or polarity options. Start_Conversion calibrates the analog to digital converter with the specified options and calibration type and initiates continuous sampling and conversion. Start_Conversion requires seven parameters to configure the sample frequency, gain, calibration type, polarity, resolution, burnout current option, and channel: each of which is discussed in detail in the following paragraphs.Start_Conversion also performs extensive error checking on each parameter to ensure that each option is valid. Table 3 lists the possible error codes returned by Start_Conversion. 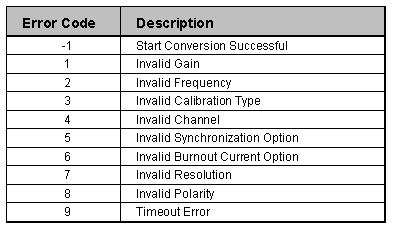 Table 3: Error Codes Returned By Start Conversion Starting A Conversion with Predetermined Calibration CoefficientsOnce you calibrate a channel using Start_Conversion, you do not have to repeat the calibration unless the temperature or power supply voltage changes. To start a conversion without a calibration use Start_Conv_With_Values. This routine allows you to quickly switch back and forth between channels without recalibrating the channel each time. Start_Conv_With_Values requires nine parameters: the full scale calibration values, zero scale calibration values, sample frequency, gain, polarity, resolution, burnout current option, synchronization option, and channel. To call Start_Conv_With_Values you need valid calibration coefficients. You can obtain these coefficients by calling Read_Zero_Cal and Read_FS_Cal after Start_Conversion is called. Be sure to save all seven parameters that specify the channel information (such as the gain, resolution, and sample frequency) along with the calibration values. See the example program in the Example Code Section for an example application using Start_Conv_With_Values to obtain and store 10 samples to an array from four channels. No error checking is done in Start_Conv_With_Values to minimize the time required to switch from one channel to another and because error checking would already have been done by Start_Conversion. The following sections describe the parameters required by Start_Conversion and Start_Conv_With_Values. |
Home|Site Map|Products|Manuals|Resources|Order|About Us
Copyright (c) 2006 Mosaic Industries, Inc.
Your source for single board computers, embedded controllers, and operator interfaces for instruments and automation