|
|
QScreen C User GuideTable of ContentsPART 1 GETTING STARTED Introduction. How to Use This Manual Chapter 1: Getting to Know Your QScreen Controller Introducing the QScreen Controller Real-Time Operating System and Built-In Function Library Choice of Programming Languages Graphical User Interface and GUI Toolkit
Performance in Harsh Environments
A Tour of Connectors and Switches Configuring QScreen Options
PART 2 PROGRAMMING THE QSCREEN CONTROLLER Chapter 3: The IDE: Writing, Compiling, Downloading and Debugging Programs Chapter 4: Making Effective Use of Memory Chapter 5: Real Time Programming
Chapter 6: Failure and Run-Time Error Recovery PART 3 COMMUNICATIONS, MEASUREMENT, AND CONTROL Chapter 7: Digital and Timer-Controlled I/O Chapter 8: Data Acquisition Using Analog to Digital Conversion Chapter 9: Serial Communications Chapter 10: The Battery-Backed Real-Time Clock PART 4: PUTTING IT ALL TOGETHER Chapter 11: A Turnkeyed Application PART 5: REFERENCE DATA |
Chapter 1 Getting to Know Your QScreen ControllerCongratulations on your choice of the QScreen Controller™. This Chapter introduces the various hardware and software features of the QScreen Controller: the graphical user interface (GUI), touchscreen, processor, memory, I/O, serial communications, RTOS and operating system functions. In this chapter you’ll learn: All about the operating system and software features of the QScreen Controller; How to connect to your controller; and, How to configure various options on your controller. Introducing the QScreen ControllerTo serve the needs of real-time control, modern embedded computers must have a set of complementary features including operating system software, device drivers, user interface, and I/O. You’ll find the QScreen Controller has a set of hardware and software that work together to simplify your product development cycle while bringing new capability to your products. The following subsections discuss the interdependent hardware and software aspects of your controller. Real-Time Operating System and Built-In Function LibraryYou wouldn’t want to have to load an operating system into your desktop computer each time you turn it on, and the same holds true for embedded computers. Importantly, all of Mosaic’s controllers incorporate a full-time, on-board operating system called QED-Forth. QED-Forth is an interactive programmable macro language encompassing a real-time operating system (RTOS), object oriented graphical user interface (GUI) toolkit, debugging environment, and a comprehensive set of pre-coded device drivers. These built-in functions make it easy for you to get the most out of your board's computational and I/O capabilities. You can fully program the QScreen Controller using only the QED-Forth programming language, or you can program it using only the C language - all of the operating system’s functions are accessible using either language. This chapter
describes how to program your QScreen Controller using the Control-C programming language, and how to use the
built-in functions. Another Manual is
available if you The RTOS in onboard Flash memory also manages all required hardware initializations and automatically initializes and starts your application code. It provides warning of power failures so you can implement an orderly shutdown, and provides the run-time security feature of a watchdog (COP - computer operating properly) timer. Programming is a snap using the interactive debugger and multitasking executive. The multitasker allows conceptually different functions of your application to run independently in different tasks while accomplishing their duties in a timely fashion. Choice of Programming LanguagesYou can program the QScreen Controller using either the ANSI-standard C language or Mosaic’s QED-Forth language. In either language, you can supplement your high-level code with assembly code. Using either language, you have full access to all firmware functions. The Control-C Programming EnvironmentOur Control-C™ cross-compiler was written by Fabius Software Systems and customized by Mosaic Industries to facilitate programming the QScreen Controller in C. It is a full ANSI C compiler and macro pre-processor; it supports floating point math, structures and unions, and allows you to program in familiar C syntax. Extensive pre-coded library functions provide easy command of the controller’s digital I/O, A/D, display, serial ports, memory manager, multitasker, and much more. Using the Windows™ environment on your PC, you can edit your C program in the supplied TextPad™ editor, and with a single mouse click you automatically compile, assemble and link your program, and generate an ASCII hex file ready for downloading. Clicking in the “Terminal” window and sending the download file to the controller completes the process: you can then type main from your terminal to execute your program. The interactive development environment also lets you examine and modify variables and array elements, and call individual functions in your program one at a time with arguments of your own choosing. This interactive environment greatly speeds the debugging process! QED-Forth High Level LanguageFor those who prefer to program in 68HC11 Assembly CodeBoth Control-C and QED-Forth include complete in-line assemblers that let you freely mix high level and assembly code. This is sometimes useful when creating specialized time-critical functions such as interrupt handlers. Extensive Hardware FunctionalityThe block diagram of Figure 1‑1 provides a cogent summary of the hardware capabilities of the QScreen Controller. Each of the hardware modules shown is described in the following sections.
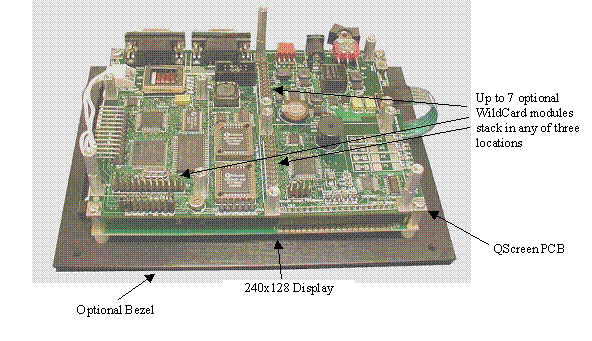
Figure 1‑1 The QScreen Controller showing up to seven optional Wildcards installed. Power Conditioning and RegulationThe QScreen Controller includes a high-efficiency switching regulator and extensive power line filtering for EMI/RFI isolation. It may be powered by applying any unregulated DC input voltage between 8 and 26 Volts. If you include the QScreen Controller in a system that already has its own supplies, you may power the QScreen Controller using regulated +5 and +12 V supplies. If you power the board with an unregulated DC supply, the onboard circuitry is protected by a built-in surge protector and electromagnetic interference (EMI) suppression circuitry. This improves the reliability of the electronics in harsh industrial environments. A 68HC11 ProcessorThe central block in Figure 1‑1 represents the 68HC11F1 microcontroller. This chip integrates a central processing unit (CPU), communications, analog and digital I/O, timing capabilities, and memory. It provides the core capabilities of the QScreen. In this document we will refer to the microcontroller chip as the 68HC11F1, or the 68HC11, or simply the HC11. The processor includes: An 8 bit timer-controlled digital I/O port called PORTA. The timer functions include “input captures” that facilitate accurate measurement of pulse widths, “output compares” that make it easy to generate pulse trains and pulse-width modulated waveforms, and a pulse accumulator. These functions are backed up by interrupts that simplify real-time response to external events. An 8 channel input port (called PORTE) on the processor that can be configured to read either analog or digital inputs. Analog inputs are converted to an 8 bit digital number by a built-in analog to digital (A/D) converter. A built-in serial communications interface (SCI). The SCI is an asynchronous interface, meaning that there is no clock transmitted with the data. Using the SCI, the QScreen Controller can transmit and receive data at standard baud rates to 19200 baud, and at non-standard rates as high as 250 Kbaud. A serial peripheral interface (SPI) capable of data transfer rates up to 2 megabits per second. Many useful devices communicate via such a synchronous (clocked) serial interface. Multiple peripheral devices can communicate on this interface as long as each device has a unique chip select signal. As we’ll see, two optional onboard analog devices exchange data with the 68HC11 via the SPI. A watchdog timer that can be configured to reset the processor if the application program fails to execute properly. A clock monitor available to reset the processor if the clock fails. External interrupt request pins and a variety of interrupt functions for quick response to real-time events. 512 bytes of electrically erasable PROM (EEPROM). 192 bytes of this nonvolatile memory are used by the operating system and 320 bytes are available for your application. EEPROM provides a convenient way to store calibration constants and other information that must be periodically updated. A 16 bit address bus and an 6 bit data bus. While the 68HC11’s native address space is 64 Kilobytes (equal to 65,536 bytes, and often written as 64K), the QScreen Controller expands the addressable memory space to 2 Megabytes by effectively adding 6 "page" bits to the address bus. Learning More about the 68HC11The QScreen Controller uses a new version of the 68HC11 microcontroller, called the 68HC11F1. Motorola’s M68HC11 Reference Manual and MC68HC11F1 Technical Data Manual are included with this documentation package as Adobe Acrobat Portable Document Format (*.pdf) files. The M68HC11 Reference Manual thoroughly describes how to use microcontrollers of the 68HC11 variety, but it does not describe some of the enhanced features that appear in the F1 version. The MC68HC11F1 Technical Data Manual provides details of the operation of the F1. Graphical User Interface and GUI ToolkitThe QScreen Controller features a touchscreen controlled graphical user interface. Combining a high-contrast 4.8” diagonal display and 5 column by 4 row touchscreen, it comes complete with object-oriented menuing software that makes it easy to control your application using buttons, menus, graphs, and bitmapped images. You can display your own custom graphics on a bright white-on-blue cold-cathode fluorescent (CCFL) backlit LCD. Display screens and graphic objects are quickly developed with most Windows paint programs, such as PC Paintbrush, allowing you to create sophisticated displays including your company logo, system diagrams, and icon-based control panels. Your application’s startup screen executes automatically on power-up. You can use as many screens as you need, each with software configurable buttons and menus. A precoded menu manager simplifies menu-driven control, making it easy to define buttons, menus, icons, and their associated actions. With the touch or release of a button, the menu manager responds, sending an appropriate command to your application program. Onboard software draws the screen graphics and responds to button presses for you, so you can focus on your application rather than display maintenance. The GUI Toolkit is described in a separate document titled “QScreen GUI Toolkit Manual”, also included on this CD. Memory and Mass Memory1M Flash and 513K RAM are standard on the QScreen Controller. Of the QScreen Controller’s 1M of Flash memory, only 64K is used by the operating system; the rest is available for your application program and data storage. Of the 513K of RAM, 509K is available for application program use. For custom QScreen’s with 128K of RAM, the RAM can be optionally battery backed. 320 bytes of on-chip nonvolatile EEPROM is also available. For those really extensive applications that require lots of memory or removable data storage, the QScreen Controller hosts compact flash cards from 64 Megabytes and up in size. Like PROM, Flash memory is nonvolatile. Thus it retains its contents even when power is removed, and provides an excellent location for storing program code. Simple write cycles to the device do not modify the memory contents, so the program code is safe even if the processor “gets lost”. But Flash memory is also re-programmable, and the Flash programming functions are present right in the QScreen Controller’s onboard software library. Measurement and ControlThe QScreen Controller provides a total of 17 I/O channels, distributed among digital, analog and serial communications functions as shown in Table 1‑1. Table 1‑1 I/O available on the QScreen Controller
For each of these I/O lines, pre-coded I/O drivers make it easy to do data acquisition, pulse width modulation, motor control, frequency measurement, data analysis, analog control, PID control, and communications. CommunicationsTwo serial ports and a fast synchronous serial peripheral interface (SPI) provide plenty of communications capability. A hardware UART drives RS232 or RS485 protocols at up to 19.2 Kbaud, and a software UART provides RS232 at up to 4800 baud. Onboard serial interface chips generate the logic levels necessary to implement either the RS232 or RS485 protocol. Two serial ports allow you to program through one while your instrument can still communicate with a third party through the other. If you need greater speed or more ports, UART Wildcards plug directly into the QScreen’s Wildcard module bus, each providing two more full-duplex RS232/485 buffered serial communication ports at up to 56 Kbaud. Extensible I/ONeed even more I/O? The QScreen Controller hosts Mosaic’s Wildcards™, small I/O modules for sophisticated and dedicated I/O. Wildcards mount onto the QScreen via the 24-pin stackable go-through headers, with up to 4 Wildcards allowed per stack. Ribbon cabling is not allowed on the Wildcard bus, as it may compromise the integrity of the signals on the control bus. Up to seven Wildcards can be stacked on the controller for: 16- or 24-bit resolution programmable gain A/D; 12-bit D/A; Compact flash mass memory; Optically isolated AC or DC solid state relays; Configurable general-purpose digital I/O; Fast, buffered RS232, RS422 or RS485 communications interfaces; or, High-voltage, high-current DC inputs and outputs. Performance in Harsh EnvironmentsEnvironmental GasketsFor operation in harsh environments an optional environmental gasket provides a tight, chemically resistant seal between your touchscreen and bezel, preventing the infiltration of dust or liquids. It allows expansion/contraction of the touchscreen surface with temperature variation, preventing touchscreen buckling yet maintains a tight seal. The gasket uses a highly compressible, highly resilient, slow-rebound cellular urethane. It experiences only negligible compression set and it is specially designed to seal with very low closure force. The gasket retains its sealing properties at constant temperatures to 158F (70C) and can survive intermittent temperatures of up to 250F (121C). It resists most common chemicals and outgasses little. We can provide environmental gaskets affixed to our bezels using a 3M pressure sensitive adhesive, or if you desire to seal to your own front panel we can adhesive the gasket to the touchscreen itself. When the controller is then mounted to your front panel it should be spaced so that gasket has a compressed thickness of 0.015”. In either case there is no charge for preinstalling the gasket. Screen ProtectorsAn optional screen protector can extend the lifetime of your touchscreen indefinitely when used in tough or dirty environments where the screen is likely to be scratched. The screen protector is a tough, transparent, non-adhesive, slip-on plastic sheet that protects your touchscreen. While the touchscreen is quite tough itself, it can be scratched by sharp objects, or slowly haze from grit on a person’s fingertips. The screen protector is a sacrificial film that greatly prolongs the life of your touchscreen, and extends its use to extreme environments, from warehouses and shipping docks, to field and laboratory use. While protecting the touchscreen, it is highly transparent and provides a glare-free surface. The screen protector is can be removed, cleaned and reinstalled to extend its lifetime. Under indoor conditions you can expect excellent screen protection over a year, after which you can simply replace the screen protector. Your touchscreen need never become scratched – protected, it should last indefinitely. The screen protector is made of a super thin, durable plastic, manufactured using a patent-pending technology that provides extended protection against dust, scratches and gouges. It is also abrasion and chemical resistant and provides a high degree of clarity and a glare-free surface. There are no adhesives used to hold screen protector onto the screen. Instead, it is sized so that its edges are retained by the environmental gasket and fit snugly between the touchscreen and the front panel or bezel of your product. The film floats on the surface and provides excellent scratch and abrasion resistance without possibly damaging your screen with adhesive. While only 0.005” thick, it is stiff enough to stay flat on the screen without warping during use. You can easily remove, clean and reinstall it without any damage to the protective screen itself or to the touchscreen. The screen protector is chemically resistant to alcohols, dilute acids, dilute alkalis, esters, hydrocarbon solvents, ketones and common household cleaning agents. You may safely clean it with an alcohol swab. EMI-Shielded Touchscreens and Intrinsic Safety BarriersAn optional EMI-shielded touchscreen is available for those applications requiring a fully shielded instrument. The EMI shield is a transparent, grounded, fully conductive layer on the outside of the touchscreen. Instruments exposed to hazardous or potentially explosive atmospheres often require an intrinsic safety barrier (ISB) between the instrument’s internal electronics and components exposed to the external atmosphere. The ISB assures that in the event of a fault the external atmosphere can not be ignited. The QScreen Controller’s touchscreen is its sole component that is exposed to the external environment; consequently in some applications an ISB may be required. As not all OEMs will need it, the ISB circuitry is optional. The combination of an EMI shield and intrinsic safety barrier provides three-fold protection – your instrument is protected from static discharge or power shorts directly to the touchscreen, EMI can not pass through the touchscreen, and a potentially hazardous external environment is protected from ignition resulting from a fault within your instrument. Getting to Know Your HardwareYour QScreen Controller comprises a touchscreen controlled graphical display and a double sided surface mount board that integrate the many hardware and software functions in a compact package.
Figure 1‑2 The QScreen Controller, display facing down. Referring to Figure 1‑2, which shows the QScreen Controller oriented with the display facing down, from top to bottom you can see the QScreen Controller has two layers: The QScreen PCB sits on top. This double sided, surface mount board is the heart of the QScreen Controller, and uses Motorola’s 16 MHz 68HC11F11 microcontroller, reconfigured for an 2 MB address space. The 68HC11 supports 21 interrupts and includes several I/O subsystems including timer-controlled counters, input-capture and output-compare lines, a fast SPI and an 8-channel, 8-bit A/D. The QScreen hosts 513K SRAM and 1M Flash, and enhances the I/O by providing two serial ports, a hardware controller for the touchscreen, and a high efficiency switching regulator to provide regulated, filtered power to other components. The QScreen also provides module ports for accommodating up to 7 WildCard I/O expansion modules for just about any kind of I/O you might need. Two modules are shown on the diagram, but you can have any combination of: 16-bit or 24-bit resolution A/D; 12-bit D/A; Isolated AC or DC solid state relays; Compact Flash Cards, 64 Mbyte and up; Logic level, high voltage, and high current digital I/O; or, Additional RS232, RS422 or RS485. The display is a high contrast CCFL white-on-blue monochrome LCD display with software controlled backlight. The display is 4.8” on a diagonal (4.25” x 2.25“) and shows 240 x 128 pixels. A 5 column by 4 row touchscreen is mounted on the front surface of the display. A software controlled beeper on the QScreen Board provides audible feedback for finger touches. An optional bezel simplifies mounting the QScreen Controller on instrument front panels. QScreen Starter KitIf you purchased a QScreen Controller Starter Kit, you should have received the following: 1. A QScreen Controller with 1M of Flash and 512k of RAM, Real Time Clock, and CCFL current controller (Part No. QSC-MM-RB-CC); 2. A 9-pin PC Serial Cable (Part No. PCC9-232); 3. A 8-26 volt Power Supply (Part No. PS-8V); 4. A CD-ROM containing: The Mosaic IDE including the TextPad source code editor and the Mosaic Terminal program; The Control-C
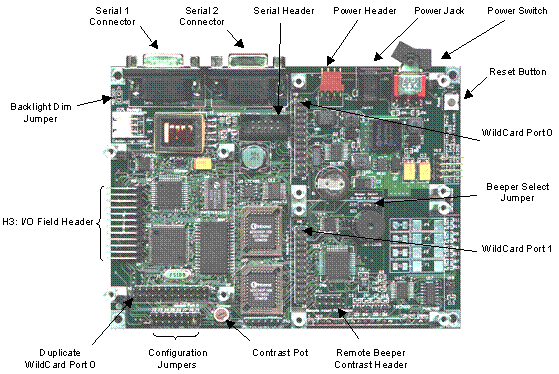
Compiler, integrated within the Mosaic IDE; Program examples; and, Motorola M68HC11 Reference Manual and MC68HC11F1 Technical Data Manual (Part No. MAN-HC11); A users guide, “The C Programmer’s Guide to The QScreen Controller”, and associated glossaries and appendixes. 5. A User’s Guide on how to use the Kernel Extension Manager for additional Wildcard Drivers. If you are missing any of these items, please contact us immediately. A Tour of Connectors and SwitchesFigure 1‑3 diagrams the positions of important components on the QScreen Controller.
Figure 1‑3 Connectors, Headers, Switches, and Jumpers on the QScreen Controller. Power Jack and Power SwitchThe power jack is located between the power header and the power switch. The QScreen Controller can be powered by any power supply that can deliver 8 to 26 volts at 3.5 watts. A switch, located between the power jack and the reset button, controls power to the QScreen Controller. The switch is in the “off” position when it is depressed away from the power jack as shown in Figure 1‑3. Primary and
| ||||||||||||||||||||||||||||||||||||||||||||||||||||
|
Jumper |
Label |
Description |
|
J1 |
CCFL DIM |
An installed jumper increases the brightness of the CCFL backlight. This jumper is installed by default. |
|
J2 |
Clean |
Puts the QScreen Controller into “special cleanup mode” on the next power-up or reset. To return the QCard Controller to its pristine, right-from-the-factory condition, install this jumper, and press the reset button, SW2. |
|
J3 |
485 |
If installed, enables RS485 communication via Serial 1. |
|
J4 |
R/RC |
If installed, enables an RC termination of the RS485 lines. Typically used for low power applications. |
|
J5 |
R |
If installed with Jumper J4, enables only resistive termination of the RS485 lines. Assumes that the other end is terminated with the same 120 Ohm resistance. |
|
J6 |
Bias |
If installed with Jumper J7, enables bias termination of the RS485 lines. Typically used to enhance noise immunity when the transceiver is inactive. |
|
J7 |
Bias |
If installed with Jumper J6, enables bias termination of the RS485 lines. Typically used to enhance noise immunity when the transceiver is inactive. |
|
J8 |
Prot |
If installed, write protects page C. Useful for “bullet proofing” a kernel extension to enable firmware updates. |
|
J9 |
Pot |
An installed jumper allows you to control the contrast voltage using the on-board POT. Remove this jumper to remotely mount a POT to control the display’s contrast. This jumper is installed by default. |
|
J10 |
Beeper Select |
If installed across the On-Board posts, enables the on-board beeper. If installed across the Remote posts, allows you to remotely mount the beeper. Typically a jumper is installed across the On-Board posts. |
Header H11, whose location is shown in Figure 1‑3, allows you to remotely mount the beeper and contrast potentiometer. This allows you to move these controls from the back of the controller to a front panel for easy access and increased audibility. The default positions of the jumpers are as follows:
For a QScreen Controller with a monochrome display, jumper shunts are installed on Jumper J9 to enable the on-board contrast potentiometer and across the On-Board posts on Jumper J10 to enable the beeper.
You can mount a beeper to your front panel for increased audibility. To remotely mount a buzzer, remove the jumper shunt across the On-Board posts of Jumper J10 and install a jumper shunt across the Remote posts of Jumper J10. Then connect your beeper across GND on pin 7 and the BEEPER_ON signal on pin 8 of header H11. The part number for the beeper is WT-1205 manufactured by Soberton Inc. You can purchase this beeper from Digikey (http://www.digikey.com).
If you have a monochrome display, its contrast will vary depending on the ambient temperature. To remotely mount a contrast potentiometer, first remove the jumper shunt across J9. Then, connect one side of your potentiometer to +5V on pin 3, the other side to VEE on pin 6, and the wiper to VCON on pin 5.
Home|Site Map|Products|Manuals|Resources|Order|About Us
Copyright (c) 2006 Mosaic Industries, Inc.
Your source for single board computers, embedded controllers, and operator interfaces for instruments and automation