

|
|
Table of ContentsConnecting To Mosaic Controller Selecting the Digital I/O Wildcard Address Current Capability of the Digital Output Lines Protecting the Input and Output Pins Connecting to the Field Header Setting the Direction of the I/O Lines C Code to initialize the Digital I/O Wildcard Forth Code to initialize the Digital I/O Wildcard C Code to control the Digital I/O Wildcard
Forth Code to control the Digital I/O Wildcard
|
Digital I/O Wildcard User GuideHardwareThe Digital I/O Wildcard expands the digital I/O capabilities of Mosaic embedded controllers. Each Digital I/O Wildcard provides 16 channels configurable in groups of four as either inputs or outputs plus 4 additional digital input channels. Each line is configurable for pull up, pull down, or tri-state operation. Outputs sink up to 24 mA or source up to 4 mA continuously. The next sections show you how to hook up the Digital I/O Wildcard to your controller, how to select the Wildcard address, and how to configure each line for pull-up, pull-down, or tri-state operation. Connecting To the Wildcard BusTo connect the Digital I/O Wildcard to a Wildcard-ready Mosaic controller or to a Wildcard Carrier Board, follow these simple steps: With the power off, connect the Wildcard Bus on the Digital I/O Wildcard to Wildcard Port 0 or Wildcard Port 1 on your controller or the Wildcard Carrier Board (These may also be called Module Port 0 or 1). If you are using a Wildcard Carrier Board, connect it to the QED Board as outlined in the "Wildcard Carrier Board Users Guide". The corner mounting holes on the Wildcard should line up with the standoffs on your controller. CAUTION: The Wildcard bus does not have keyed connectors. Be sure to insert the Wildcard so that all pins are connected. The Mosaic controllers and the Digital I/O Wildcard can be permanently damaged if the connection is done incorrectly. Selecting the Wildcard AddressOnce you have connected the Wildcard you must set the address of the module using jumper shunts across J20 and J21. These Wildcard Select Jumpers select a 2-bit code that sets a unique address on the Wildcard port of the Mosaic controller. Each Wildcard port on the controller board accommodates up to 4 Wildcards. Wildcard Port 0 on the Mosaic controller provides access to Wildcards addressed at locations 0-3 while Wildcard Port 1 provides access to Wildcards 4-7. Two Wildcards on the same port cannot have the same address (jumper settings). Table 1-2 shows the possible jumper settings and the corresponding addresses.Table 1-2: Jumper Settings and Associated Addresses 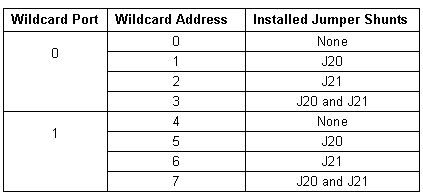 Configuring the Digital I/O LinesYou may configure each I/O line for pull-up, pull-down, or tri-state operation. This allows you to set the appropriate level of each I/O line between power-up and software initialization. There are twenty three-post jumpers on the Digital I/O Wildcard labeled J0-J19. The labels are located next to each jumper post. The jumpers are used to configure the twenty digital I/O lines for pull-up, pull-down, or tri-state operation. To configure a digital line for pull-up operation, simply install a jumper shunt across the two jumper posts above the + sign located next to the jumper label. To configure a digital line for pull-down operation, install the jumper shunt across the two pins above the − sign. By not installing a jumper shunt, the line is configured for tri-state operation. Once you have connected and configured all of the hardware, you can use the software drivers to read or set the digital lines. |
Home|Site Map|Products|Manuals|Resources|Order|About Us
Copyright (c) 2006 Mosaic Industries, Inc.
Your source for single board computers, embedded controllers, and operator interfaces for instruments and automation