|
|
Table of ContentsSignal Conditioning Wildcard Hardware Connecting an Analog I/O Wildcard to the Wildcard Bus Configuring the Analog I/O Wildcard
Connecting to the Signal Conditioning Wildcard Headers on the Signal Conditioning Wildcard
|
The Signal Conditioning Wildcard User GuideSignal Conditioning Wildcard HardwareThe Signal Conditioning Wildcard contains circuitry that converts the digital to analog (DAC) outputs and analog to digital (ADC) inputs on the Analog I/O Wildcard Field Header to the voltage and current ranges on the Signal Conditioning Wildcard’s Field Header as described by the following table: 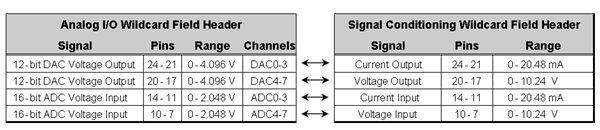
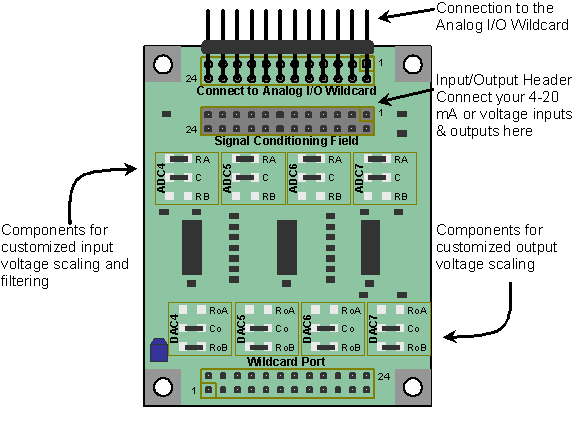
The Wildcard provides three headers: a Wildcard bus header, a header to connect to the Analog I/O Wildcard’s field header, and an Input/Output field header. There is a one-to-one correspondence between the pins on the Analog I/O Wildcard Field Header and the Signal Conditioning Wildcard’s Input/Output Field Header. Each I/O signal of the Analog I/O Wildcard is modified by the Signal Conditioning Wildcard (by conversion to/from a greater voltage or current) and presented at the same pin location on its own Input/Output header. The positions of the headers are shown in Figure 1.
Figure 1 Signal Conditioning Wildcard showing default configuration components Connecting an Analog I/O Wildcard to the Wildcard BusTo connect an Analog I/O Wildcard (which is required to use the Signal Conditioning Wildcard) to a Wildcard bus on a controller board, follow these simple steps: With the power off, connect the female 24-pin side of the stacking go-through Wildcard bus header on the bottom of the Analog I/O Wildcard to Wildcard Port 0 or Wildcard Port 1 on the Wildcard bus on the controller board. The corner mounting holes on the Wildcard should line up with the standoffs on the controller board. The Wildcard ports are labeled on the silkscreen of the controller board. Note that the Analog I/O Wildcard headers are configured to allow direct stacking onto the Wildcard bus, even if other Wildcards are also installed. Do not use ribbon cables to connect the Analog I/O Wildcard to the Wildcard bus. CAUTION: The Wildcard bus does not have keyed connectors. Be sure to insert the module so that all pins are connected. The Wildcard bus and the Analog I/O Wildcard can be permanently damaged if the connection is done incorrectly. Always make the connection with the power off. Configuring the Analog I/O WildcardOnce you have connected the Analog I/O Wildcard to the Wildcard bus, you must set the address of the module using jumper shunts across J1 and J2. The Wildcard Select Jumpers, labeled J1 and J2, select a 2-bit code that sets a unique address on the Wildcard port of the Mosaic controller. Each Wildcard port on the Mosaic controller accommodates up to 4 Wildcards. Wildcard Port 0 provides access to modules 0-3 while Wildcard Port 1 provides access to modules 4-7. Two Wildcards on the same port cannot have the same address (jumper settings). The following table shows the possible jumper settings and the corresponding addresses.
You also need to install J3, which connects the DAC reference pin to the A/D reference input pin, and J6 which connects the reference voltage to pin 4 of the Analog I/O Wildcard field header. No other voltage reference jumpers should be installed. In software, you must set the DAC’s internally generated reference voltage to 2.048 volts by passing the constant INT_2V_DAC12 to the Init_Analog_IO function. This will configure the Analog I/O Wildcard’s 12-bit DAC output to have a range of 0 to 4.096 volts and its 16-bit A/D input range of 0 to 2.048 volts. Please consult the Analog I/O Wildcard manual for more information. Connecting to the Signal Conditioning WildcardOnce the Analog I/O Wildcard is installed and configured, you can now install the Signal Conditioning Wildcard. 1. With the power off, connect the female 24-pin side of the stacking go-through Wildcard bus header on the bottom of the Signal Conditioning Wildcard on top of your Analog I/O Wildcard. The corner mounting holes on the module should line up with the standoffs on the controller board. Do not use ribbon cables to connect the Signal Conditioning Wildcard to your Analog I/O Wildcard. 2. Connect one end of the 24 pin ribbon cable (shipped with your Signal Conditioning Wildcard) into the Field Header H3 of an Analog I/O Wildcard. Be sure to align the red stripe on the cable to pin one of the header. 3. Connect the other end of the cable into the Analog I/O Field Header, H2 of the Signal Conditioning Wildcard. Note that using a single 24-pin ribbon cable connects all of the Analog I/O Wildcards inputs and outputs to the Signal Conditioning Wildcard. However, in some applications you may prefer to use some of the Analog I/O signals directly, without filtering through the Signal Conditioning Wildcard. For example, you may not need the 0-20 mA current inputs and outputs of the Signal Conditioning Wildcard. In that case you can still continue to use the Analog I/O Wildcard inputs and outputs that would otherwise be directed to the Signal Conditioning Wildcard by breaking apart the 24-pin cable and making separate connections directly to the Analog I/O Wildcard as needed. Now you are ready to connect your signals to field header H1 of the Signal Conditioning Wildcard. Connecting Power and GroundsThe Wildcard derives its power from the V+RAW and GND pins of the Wildcard bus. This Wildcard requires a somewhat higher voltage supply than most other Wildcards – for proper operation, the V+RAW supply must be in the range of 12.5 to 26 V. To prevent the creation of ground loops that will induce offset errors into your circuits, be sure to reference all inputs (0 to 20 mA or 0 to 10V) and outputs (0 to 20mA and 0 to 10V) to the ground of pins 5, 6, 15, and 16 on the Input/Output Connector (i.e., not to the digital ground). | ||||||||||||||||||||||||
Home|Site Map|Products|Manuals|Resources|Order|About Us
Copyright (c) 2006 Mosaic Industries, Inc.
Your source for single board computers, embedded controllers, and operator interfaces for instruments and automation