|
|
QCard C User GuideTable of ContentsPART 1 GETTING STARTED Chapter 1: Getting to Know Your QCard Controller Chapter 2: Using Your PowerDock PART 2 PROGRAMMING THE QCARD CONTROLLER Chapter 4: The IDE: Writing, Compiling, Downloading and Debugging Chapter 5: Making Effective Use of Memory Chapter 6: Real Time Programming
Chapter 7: Failure and Run-Time Error Recovery
PART 3 COMMUNICATIONS, MEASUREMENT, AND CONTROL Chapter 8: Digital and Timer-Controlled I/O Chapter 9: Data Acquisition Using Analog to Digital Conversion Chapter 10: Serial Communications Chapter 11: The Battery-Backed Real-Time Clock PART 4 PUTTING IT ALL TOGETHER Chapter 12: A Turnkeyed Application PART 5 REFERENCE DATA Appendix A: QCard Electrical Specifications Appendix C: Schematics (zip) |
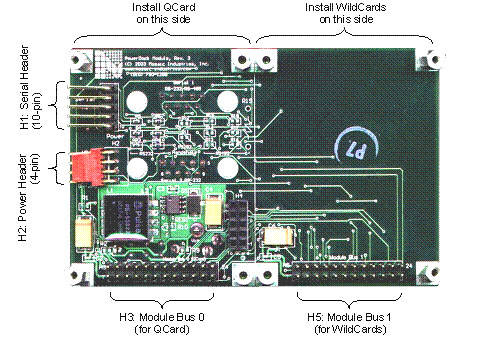
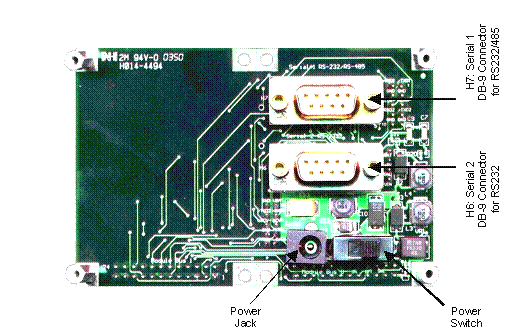
Chapter 2 Using Your PowerDockThe PowerDock provides a mechanical and electronic platform for the QCard Controller and additional WildCards. It hosts a high-efficiency 1 amp 5 volt switching power supply, dual DB-9 serial connectors, a power jack, and a master power switch. The serial connectors, jack and switch are designed for easy mounting to an instrument panel. This chapter will familiarize you with the PowerDock hardware and its functions. In particular, you’ll learn: The locations and pinouts of the PowerDock’s connectors and header; and, How to connect your QCard Controller to your PowerDock. A Tour of the HardwareFigure 2‑1 and Figure 2‑2 show both sides of a wide version of the PowerDock. All of the connectors and headers are described in the following sections. A narrow version is also available for space constrained applications. The narrow version is one half the size, and provides a single WildCard module header instead of two. Consequently, it can host a QCard and four WildCards. The PowerDock’s Front SideLooking at the front side of the wide version of the PowerDock board, you can see that it provides two WildCard module headers, one on the half of the board with the power supply, and the other on the predominantly empty half. You can directly plug in a QCard Controller over the power supply components. Up to four WildCards can then stack on top of the QCard using the stacking go-through connector. Additionally, up to four WildCards can stack on the other half of the PowerDock, in any order. The PowerDock’s Back SideThe PowerDock’s back side hosts serial connectors, a power switch and a power jack. They are mounted so that the board can mount directly to an instrument panel if desired using ½ inch stand-offs. The instrument panel requires cutouts for the serial connectors, and holes for the power switch and power jack.
Figure 2‑1 The front side of a wide PowerDock.
Figure 2‑2 The back side of a wide PowerDock. PowerThe PowerDock takes an unregulated 8 to 26 volts from the power jack shown in Figure 2‑2 or through the power header shown in Figure 2‑1 and passes it though an EMI filter and surge protection circuitry to provide a clean V+Raw supply (for any WildCards that might need it). The V+Raw is then regulated using a very clean, high-efficiency switching regulator to create a 5 volt power source. The switching regulator using a following low pass LC filter to assure that switching ripple is less than 5 mVp-p. The power source can supply up to 1 amp; plenty for powering a QCard Controller and 8 Wildcards. Power HeaderThe following table provides the power header’s pinout: Power Header
If a battery is installed on your QCard (i.e. you ordered the Starter Kit or the QCard with the Real time clock option), the VBAT signal allows you to monitor the state of the battery. If a battery is not installed, you can use this signal to externally battery backup your memory by supplying 3 to 5 volts when your system is off. Communications ConnectorsThe Qcard’s two serial ports are brought out to the two DB-9 connectors as shown in Figure 2‑2 and the 10-pin right angle header as shown in Figure 2‑1. The primary serial port on the QCard can be jumper configured for RS232 or RS485 communication. However, only the RS232 lines are brought out to the DB-9 Connector. Surface mount resistor pads on the PowerDock allow you to configure the signals going to the DB-9 connector for RS485 operation. Please see the schematic of the PowerDock in the appendix for more information and contact Mosaic Industries for custom configurations. The secondary serial port is implemented in software and can only be used for RS232 communication up to 4800 baud. However, resistor pads on the PowerDock also allow you to use the signals that implement the secondary serial port for RS232 hardware handshaking on the primary serial port. Standard DB-9 Serial Connector ConfigurationsDB-9 Connector 1 DB-9 Connector 2
Communications HeaderBoth serial ports of the QCard are brought out to the communications header on the PowerDock. The communications header on the QCard differs slightly from the communications header on the PowerDock. Pin 10 on the QCard communications header is the VBAT signal while pin 10 on the PowerDock’s header is +5V. Additionally, the PowerDock’s communications header does not contain the /MOD1.CS signal on pin 4, replacing it with digital ground (GND) instead. PowerDock Communications Header
Wildcard HeadersThe QCard’s WildCard Port Header (identified as Port 0) allows you to mount up to four WildCards simultaneously on a single QCard at module addresses 0 through 3. The wide version of the PowerDock provides an additional WildCard port (identified as Port 1) to accommodate up to four more stacked WildCards at module addresses 4 through 7. The 24-pin stackable go-through Wildcard connectors provide the following signals: Wildcard Port Header
How To Install Your QCardIf you ordered the QCard Starter Kit, the QCard and PowerDock should have been shipped to you assembled together. However, if you purchased them separately, it is a snap to put them together. The QCard mounts on the PowerDock on Wildcard Port Header 0 over the Serial Header and Power Header shown in Figure 2‑1. Be sure the power is OFF before installing a QCard onto a PowerDock and be sure to align the four mounting holes on each corner; installing a QCard incorrectly or with the power ON may damage the controller! | |||||||||||||||||||||||||||||||||||||||||||||||||||||||||||||||||||||||||||||||||||||||||||||||||||||||||||||||||||||||||||||||||||||||||||||||||||||||||||||||||||||||||||||||||||||||||||||||||||||||||||||||||||||||||||||||||||||||||||||||||||||||||||||||||||||||||||||||||||||||||||||||||||||||||||||||||||||||||||||||||||||||||||||||||||
Home|Site Map|Products|Manuals|Resources|Order|About Us
Copyright (c) 2006 Mosaic Industries, Inc.
Your source for single board computers, embedded controllers, and operator interfaces for instruments and automation