|
|
QCard C User GuideTable of ContentsPART 1 GETTING STARTED Chapter 1: Getting to Know Your QCard Controller Introducing the QCard Controller Real-Time Operating System and Built-In Choice of Programming Languages Extensible I/O including Keypad/Display A Tour of the Headers and Jumpers Chapter 2: Using Your PowerDock PART 2 PROGRAMMING THE QCARD CONTROLLER Chapter 4: The IDE: Writing, Compiling, Downloading and Debugging Chapter 5: Making Effective Use of Memory Chapter 6: Real Time Programming
Chapter 7: Failure and Run-Time Error Recovery
PART 3 COMMUNICATIONS, MEASUREMENT, AND CONTROL Chapter 8: Digital and Timer-Controlled I/O Chapter 9: Data Acquisition Using Analog to Digital Conversion Chapter 10: Serial Communications Chapter 11: The Battery-Backed Real-Time Clock PART 4 PUTTING IT ALL TOGETHER Chapter 12: A Turnkeyed Application PART 5 REFERENCE DATA Appendix A: QCard Electrical Specifications Appendix C: Schematics (zip) |
Chapter 1 Getting to Know Your QCard ControllerCongratulations on your choice of the QCard Controller™. This Chapter introduces the various software and hardware features of the QCard Controller: the RTOS, choice of programming languages, processor, memory, serial communications, real-time clock, and I/O. In this chapter you’ll learn: All about the operating system and software features of the QCard Controller; All of the hardware features of your controller; and, How to configure various options on your controller. Introducing the QCard ControllerTo serve the needs of real-time control, modern embedded computers must have a set of complementary features including operating system software, device drivers, user interface, and expandable I/O. You’ll find the QCard Controller has a set of hardware and software that work together to simplify your product development cycle while bringing new capability to your products. The QCardÔ packs a programmable computer, up to 1 megabyte of memory, communications, analog and digital I/O, and an expansion I/O bus onto a tiny low-cost board. This 2” x 2.5” single board computer is perfect for space-constrained applications and dramatically cuts the cost of data acquisition and control. It is ideal for machine automation, industrial control, robotics, handheld data acquisition, and scientific instrumentation. The I/O-rich QCard hosts a 16 MHz Motorola 68HC11F1 microprocessor, 512K Flash and 128K RAM (expandable to 512K), and 320 bytes of EEPROM. On-board I/O includes 8 digital I/O lines with counter/timer capabilities, 8 analog inputs, a fast synchronous SPI serial interface, and dual RS232/485 ports. An optional real-time clock tracks the calendar and time of day and battery backs the 128K RAM. The QCard is easily programmable in C, Forth or Assembly using any PC. Built-in programming tools include an interactive debugger, a multitasking executive, and comprehensive device-driver libraries. Convenient connectors allow for simple mechanical integration. The QCard can directly host up to 4 I/O expansion modules called WildCardsÔ that you can mix and match depending on your application. The easy to use WildCards stack onto the 24 pin WildCard connector on the QCard. A con-venient PowerDockÔ module includes an efficient switching power regulator and expands the WildCard bus to host up to 8 WildCards. WildCards implement a wide variety of user interface, communications, data acquisition and control capabilities. Available WildCards include a Keypad/Display module, octal 12-bit D/A and 16-bit A/D converters, a 24-bit resolution analog data acquisition subsystem, Compact Flash card mass memory interface, fast buffered RS232/485 dual UART, high voltage/high current isolated I/O, and AC or DC solid state relays. You can select the WildCards that meet your needs to configure a cost-effective customized controller for your application. The following subsections discuss the interdependent hardware and software aspects of your controller. Real-Time Operating System and Built-In Function LibraryYou wouldn’t want to have to load an operating system into your desktop computer each time you turn it on, and the same holds true for embedded computers. Importantly, all of Mosaic’s controllers incorporate a full-time, on-board operating system called QED-Forth. QED-Forth is an interactive programmable macro language encompassing a real-time operating system (RTOS), object oriented graphical user interface (GUI) toolkit, debugging environment, and a comprehensive set of pre-coded device drivers. These built-in functions make it easy for you to get the most out of your board's computational and I/O capabilities. You can fully program the QCard Controller using only the QED-Forth programming language, or you can program it using only the C language – all of the operating system’s functions are accessible using either language. This chapter describes how to program your QCard
Controller using the Control-C programming language, and
how to use the built-in functions. Another chapter is available if you The RTOS in onboard Flash memory also manages all required hardware initializations and automatically starts your application code. It provides warning of power failures so you can implement an orderly shutdown, and provides the run-time security feature of a watchdog (COP - computer operating properly) timer. Programming is a snap using the interactive debugger and multitasking executive. The multitasker allows conceptually different functions of your application to run independently in different tasks while accomplishing their duties in a timely fashion. Choice of Programming LanguagesYou can program the QCard Controller using either the ANSI-standard
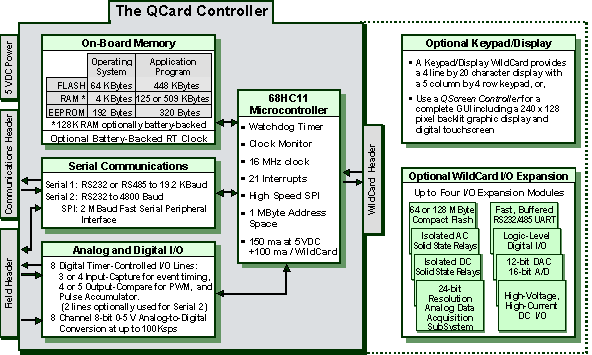
C language or Mosaic’s QED-Forth language. The Control-C Programming EnvironmentOur Control-C™ cross-compiler was written by Fabius Software Systems and customized by Mosaic Industries to facilitate programming the QCard Controller in C. It is a full ANSI C compiler and macro pre-processor; it supports floating point math, structures and unions, and allows you to program in familiar C syntax. Extensive pre-coded library functions provide easy command of the controller’s digital I/O, A/D, serial ports, memory manager, multitasker, and much more. Using the Windows™ environment on your PC, you can edit your C program in the supplied Mosaic IDE, and with a single mouse click you automatically compile, assemble and link your program, and generate an ASCII hex file ready for downloading. Clicking in the “Terminal” window and sending the download file to the controller completes the process: you can then type main from your terminal to execute your program. The interactive development environment also lets you examine and modify variables and array elements, and call individual functions in your program one at a time with arguments of your own choosing. This interactive environment greatly speeds the debugging process! QED-Forth High Level LanguageFor those who prefer to program in FORTH, no external compiler is needed. You interact with the QED-Forth operating system (an RTOS, interpreter and compiler, all rolled into one) using your PC as a terminal. When programming in Forth you can use the Mosaic IDE (or you can use any other editor you prefer) to write your code and download the source code directly to the controller where it is compiled as it downloads. As we will see, even C programmers benefit greatly by the presence of the QED-Forth operating system, as the built-in Forth language provides a quick and easy way to interactively “talk to” your QED Board while debugging your C programs. 68HC11 Assembly CodeBoth Control-C and QED-Forth include complete in-line assemblers that let you freely mix high level and assembly code. This is sometimes useful when creating specialized time-critical functions such as interrupt handlers. Hardware FunctionalityThe block diagram of Figure 1‑1 provides a cogent summary of the hardware capabilities of the QCard Controller. Each of the hardware modules shown is described in the following sections.
Figure 1‑1 The QCard Controller. The QCard directly hosts up to four WildCard I/O modules; mounted on a PowerDock it hosts up to eight WildCards. Power RequirementsThe QCard requires a regulated +5 V supply and draws a maximum of 150 ma. It directly hosts up to four WildCards, each requiring a maximum of 100 ma. Some WildCards require an additional +8-26 V supply. The QCard Controller optionally mounts on a PowerDock which provides a 1 amp 5 volt switching power supply, dual DB-9 serial connectors, a power jack, a master power switch, plus an additional WildCard header for hosting four additional WildCards. The serial connectors, jack and switch are designed for easy mounting to an instrument panel. A 68HC11 ProcessorThe central block in Figure 1‑1 represents the 68HC11F1 microcontroller. This chip integrates a central processing unit (CPU), communications, analog and digital I/O, timing capabilities, and memory. It provides the core capabilities of the QCard. In this document we will refer to the microcontroller chip as the 68HC11F1, the 68HC11, or simply the HC11. The processor includes: An 8 bit timer-controlled digital I/O port called PORTA. The timer functions include "input captures" that facilitate accurate measurement of pulse widths, "output compares" that make it easy to generate pulse trains and pulse-width modulated waveforms, and a pulse accumulator. These functions are backed up by interrupts that simplify real-time response to external events. An 8 channel input port (called PORTE) on the processor that can be configured to read either analog or digital inputs. Analog inputs are converted to an 8 bit digital number by a built-in analog to digital (A/D) converter. A built-in serial communications interface (SCI). The SCI is an asynchronous interface, meaning that there is no clock transmitted with the data. Using the SCI, the QCard Controller can transmit and receive data at standard baud rates to 19200 baud, and at non-standard intra-character rates as high as 250 Kbaud. A serial peripheral interface (SPI) capable of data transfer rates up to 2 megabits per second. Many useful devices communicate via such a synchronous (clocked) serial interface. Multiple peripheral devices can communicate on this interface as long as each device has a unique chip select signal. A watchdog timer that can be configured to reset the processor if the application program fails to execute properly. A clock monitor available to reset the processor if the clock fails. External interrupt request pins and a variety of interrupt functions for quick response to real-time events. 512 bytes of nonvolatile, electrically erasable PROM (EEPROM). Of this, 192 bytes are used by the operating system and 320 bytes are available for your application. EEPROM provides a convenient way to store calibration constants and other information that must be periodically updated. A 16 bit address bus and an 8 bit data bus. While the 68HC11’s native address space is 64 Kilobytes (equal to 65,536 bytes, and often written as 64K), the QCard Controller expands the addressable memory space to 1 Megabyte by effectively adding 5 “page” bits to the address bus. Learning More about the 68HC11The QCard Controller uses a new version of the 68HC11 microcontroller, called the 68HC11F1. Motorola’s M68HC11 Reference Manual and MC68HC11F1 Technical Data Manual are included with this documentation package as Adobe Acrobat Portable Document Format (*.pdf) files. The M68HC11 Reference Manual thoroughly describes how to use microcontrollers of the 68HC11 variety, but it does not describe some of the enhanced features that appear in the F1 version. The MC68HC11F1 Technical Data Manual provides details of the operation of the F1. Memory and Mass MemoryThe QCard includes 512K Flash memory, 128K RAM (or 512K RAM with the expanded memory option), 512 bytes of EEPROM and an additional1K RAM (on the processor). Of the 512K of Flash memory, 448K is available for your application program and data storage; the remainder is used by the operating system. Of the 129K (513K, with expanded memory option) of RAM, 125K (509K) is available for application program use. Like PROM, Flash memory is nonvolatile. Thus it retains its contents even when power is removed, and provides an excellent location for storing program code. Simple write-cycles to the device do not modify the memory contents, so the program code is safe even if the processor “gets lost” and overwrites memory. But Flash memory is also re-programmable, and the Flash programming functions are present right in the QCard’s onboard software library. You can also add 64 MBytes or more of removable mass memory by plugging in a Compact Flash WildCard module. Measurement and ControlThe QCard Controller provides a total of 17 I/O channels, distributed among digital, analog and serial communications functions as shown in Table 1‑1. Table 1‑1 I/O available on the QCard Controller
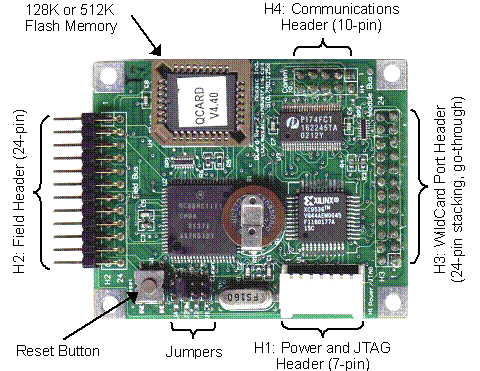
For each of these I/O lines, pre-coded I/O drivers make it easy to do data acquisition, pulse width modulation, motor control, frequency measurement, data analysis, analog control, PID control, and communications. You may add any amount of additional I/O using WildCards. CommunicationsTwo serial ports and a fast synchronous serial peripheral interface (SPI) provide plenty of communi-cations capability. A hardware UART with single character buffer drives RS232 or RS485 protocols at up to 19.2 Kbaud (the default serial baud rate), and a software UART provides RS232 at up to 4800 baud. Onboard serial interface chips generate the logic levels necessary to implement either the RS232 or RS485 protocol. Two serial ports allow you to program through one while your instrument can still communicate with a third party through the other. The RS485 communications port may be optionally terminated with a resistor or RC network. Pads are also included on the board for insertion of RS485 network bias resistors. If you need greater speed or more ports, UART Wildcards plug directly into the QCard’s Wildcard module bus, each providing two more full-duplex RS232/422/485 buffered serial communication ports at up to 56 Kbaud. Real-Time ClockA battery-backed real time clock (RTC) may be optionally included. If so, the RTC’s battery also backs-up the 128K RAM. Note however that if the expanded memory option is chosen, providing 512K of RAM, then none of the RAM can be battery-backed, but the onboard battery still powers the RTC. Extensible I/O including Keypad/DisplayNeed even more I/O? The QCard hosts Mosaic’s WildCards, small I/O modules for sophisticated and dedicated I/O. Up to four WildCards can be stacked directly on the controller. If the QCard is mounted on a PowerDock, up to eight WildCards can be used simultaneously, four stacked on the QCard and four in a companion stack on the PowerDock. Available WildCards include: A Keypad/Display module with a 4 line by 20 character LCD display and a 20 button keypad; 16- or 24-bit resolution programmable gain A/D; 12-bit D/A; Compact flash mass memory; Optically isolated AC or DC solid state relays; Configurable general-purpose digital I/O; Fast, buffered RS232, RS422 or RS485 communications interfaces; or, High-voltage, high-current DC inputs and outputs. Getting to Know Your HardwareQCard Starter KitIf you purchased a QCard Controller Starter Kit, you should have received the following: 1. A QCard Controller with 128K BBRAM and Real-Time Clock (Part No. QCC-RB); 2. A wide version of the PowerDock (Part No. PDW); 3. A 9-pin PC Serial Cable (Part No. PCC9-232); 4. An 8-26 volt Power Supply (Part No. PS-8V); 5. A CD-ROM containing: The Mosaic IDE including a TextPad source code editor and the Mosaic Terminal program; The Control-C Compiler, integrated within the Mosaic IDE; Program examples; and, Motorola M68HC11 Reference Manual and MC68HC11F1 Technical Data Manual (Part No. MAN-HC11); 6. A User’s Guide on how to use the Kernel Extension Manager for additional Wildcard Drivers. If you are missing any of these items, please contact us immediately. A Tour of the Headers and JumpersFigure 1‑2 shows a photo of the top side of the 2” x 2.5” QCard, and diagrams the positions of the headers and jumpers.
Figure 1‑2 Headers and Jumpers on the QCard Controller. Configuring Jumpers on the QCard ControllerThe actions of the configurable jumpers on the QCard Controller are summarized in Table 1‑2. The jumpers are in order with J1 nearest the crystal and J4 nearest the reset switch. Table 1‑2 QCard Controller Jumper Summary.
Power HeaderThe QCard requires that a regulated +5VDC supply be connected either to the power header (H1), the field header (H2), or the WildCard module header (H3). If WildCards are mounted to the QCard some of them may additionally require that a greater DC voltage of +8 to +26 VDC, designated V+Raw, be applied to the power header. The power header also hosts pins used for JTAG programming of a CPLD on the board, but you will generally not need to use this facility. The following table provides the power header’s pinout: H1: Power Header
Communications Header Hosts Primary and Secondary Serial PortsThe primary serial port, designated Serial 1, can be configured for RS232 communication at standard rates up to 19,200 baud and nonstandard rates to 250,000 baud. The secondary serial port, Serial 2, which can be used for pe-ripheral devices such as a printer or a barcode reader, has a maximum baud rate of 4800 baud. Both serial ports bring out their transmit and receive pins to the communications header. The primary serial port can be jumper configured for RS485 operation; in that case the XCVR± pins are used. Pin 10 on the communications header provides access to the real time clock’s backup battery, +VBAT. If the QCard is mounted on a PowerDock the corresponding communications header on the PowerDock provides +5V instead of +VBAT on pin 10. Additionally, the PowerDock’s communications header does not contain the /MOD1.CS signal on pin 4, replacing it with digital ground (DGND) instead. H4: Communications Header
Field HeaderThe QCard’s field header provides access to all of its I/O and power signals, including its serial communications, analog inputs, and timer-controlled digital I/O lines. If convenient, you may power the QCard through this header’s power pins. H2: Field Header
Wildcard I/O Expansion InterfaceThe QCard’s WildCard Port Header (identified as Port 0) allows you to mount up to four WildCards simultaneously on a single QCard at module addresses 0 through 3. If the QCard is mounted on a wide version of the PowerDock, the PowerDock provides an additional WildCard port (identified as Port 1) to accommodate up to four more stacked WildCards at module addresses 4 through 7. If a Keypad/Display Wildcard is installed, it must be configured as module number 0 so that kernel-resident software drivers can be used. The Wildcards mount onto the QCard and PowerDock via the 24-pin stackable go-through headers, with up to 4 Wildcards allowed per stack. Ribbon cabling is not allowed on the Wildcard bus, as it may compromise the integrity of the signals on the control bus. The 24-pin Wildcard headers provide the following signals: H3: WildCard Port Header
| Next>> | ||||||||||||||||||||||||||||||||||||||||||||||||||||||||||||||||||||||||||||||||||||||||||||||||||||||||||||||||||||||||||||||||||||||||||||||||||||||||||||||||||||||||||||||||||||||||||||||||||||||||||||||||||||||||||||||||||||||||||||||||||||||||||||||||||||||||||||||||||||||||||||||||||||||||||||||||||||||||||||||||||
Home|Site Map|Products|Manuals|Resources|Order|About Us
Copyright (c) 2006 Mosaic Industries, Inc.
Your source for single board computers, embedded controllers, and operator interfaces for instruments and automation