|
|
The C Programmer’s Guide to the Mosaic HandheldTable of ContentsPART 1 GETTING STARTED Introduction. How to Use This Manual Chapter 1: Getting to Know Your Handheld Instrument Introducing the Mosaic Handheld Choice of Programming Languages Personality Board and Extensible I/O Chapter 2: Powering Your Handheld PART 2 PROGRAMMING THE MOSAIC HANDHELD Chapter 4: The IDE: Writing, Compiling, Downloading and Debugging Programs Chapter 5: Making Effective Use of Memory Chapter 6: Real Time Programming Chapter 7: Failure and Run-Time Error Recovery Chapter 8: Programming the Graphical User Interface PART 3 COMMUNICATIONS, MEASUREMENT, AND CONTROL Chapter 9: Digital and Timer-Controlled I/O Chapter 11: Serial Communications Chapter 12: The Battery-Backed Real Time Clock Chapter 13: Customizing the Handheld's I/O PART 4: REFERENCE DATA |
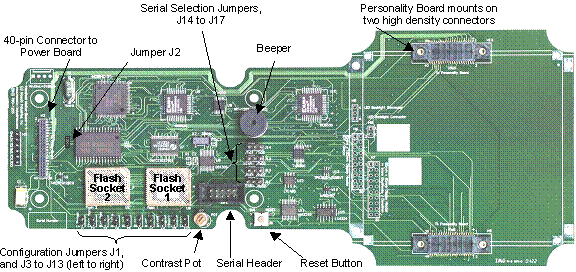
Chapter 1 (continued) Getting to Know Your HardwareHandheld Starter KitIf you purchased a Mosaic Handheld Starter Kit, you should have received the following. If you are missing any of these items, please contact us immediately: 1. A Mosaic Handheld with -MM option – memory expanded to 1 MB Flash and 512K RAM (battery backed by the NiMH battery pack), -RB option – real-time clock, and -BT option – high capacity NiMH batteries; 2. Serial cables including 9-pin DB-9 PC serial cable (Part No. PCC9-232), Dual 9-pin DB-9 to 10-pin IDC cable (Part No. QED-COM-CABLE-9), and, 25-pin DB-25M to 9-pin DB-9F serial adapter cable for connection to the Handheld’s DB-25F (Part No. HHADAP-9F25M); 3. A 40-pin ribbon cable to connect the Handheld’s processor and power boards when the unit is opened (HH-40-CABLE); 4. A 25V, 20W power adapter (Part No.PS-HH-24V); 5. A CD-ROM containing: The Mosaic IDE and the Control-C Compiler, integrated within the Mosaic IDE; Documentation; Program examples; and, Motorola M68HC11 Reference Manual and MC68HC11F1 Technical Data Manual (Part No. MAN-HC11); 6. A User’s Guide on how to use the Kernel Extension Manager for additional Wildcard Drivers. Opening and Closing the HandheldOpening the Handheld is required to access the serial communications header, install new WildCards, or customize the Personality Board. Before attempting to open the enclosure, be sure all cables are removed from the enclosure including the power cable and any DB-25 tether, and that the Handheld is off. If the Handheld is on, holding down the ON/OFF key for longer than three seconds will turn it off. To open the enclosure, turn the Handheld over so that the display is face down (but be careful not to scratch it). Remove the six screws that fasten the battery compartment cover using a Phillips screwdriver and remove the battery compartment cover. The battery compartment is located on the bottom of the Handheld on the back of its handle. There are four additional screws located under the battery compartment cover in addition to the four holes on the top of the Handheld. Remove these eight screws with a Phillips screwdriver to open the enclosure. You can then gently pull apart the two half shells. You’ll notice that the processor board, mounted on the top shell just under the keypad, and the power board, mounted on the bottom shell just over the battery compartment, had been connected together with a single high-density connector. Once open, you can operate the Handheld by connecting a cable between the high-density connectors on the processor and power boards. A 40-pin ribbon cable is supplied for that purpose. When using it, be sure that the marked side of the ribbon cable connects to the pin 1 end of both connectors. You can also connect the 10-pin serial cable to the processor board’s serial header, shown in Figure 1‑2. Connecting Cables for DevelopmentOnce the enclosure is open, the handheld separates into two pieces. The top shell contains the Proc-essor Board (including CPU, memory, and logic), Personality Board, CF WildCard or other installed WildCards, Display, and Keypad. The bottom shell contains the Power Board and battery compartment. To establish serial communication with the Handheld, connect the DB-9 serial cable to your PC. Next, connect the Handheld Serial Cable to the DB-9 Serial Cable and the dual row IDC connector to the shrouded 10-pin serial header H4 on the Processor Board. You can also connect you serial line to the external DB25 connector whether the Handheld is open or closed. Carefully connect the male end of the 40-pin ribbon cable to the female connector on the Processor Board. When inserting the male connector gently insert it dead center. If it is angled too far from vertical it is very easy to permanently damage the connector on the Processor Board. Also, be sure you connect pin 1 of the cable, as indicated by the red stripe, to pin 1 of the header, as indicated by the silk screen on the Processor Board PCB. Be careful! The connector and the header are not shrouded or polarized, and plugging in the cable incorrectly may damage the Processor Board, any connected WildCards, or the Power Board. Next, connect the female end of the 40-pin ribbon cable to the male connector on the Power Board. Finally, plug in the power supply into the power jack (located on the side of the Power Board). Turning on and Using the HandheldWith the Handheld open, you can still turn it on by pressing the ON/OFF button. With your serial cables connected and the PC running the Mosaic Terminal program you should see the QED-Forth “ok” prompt on the PC screen. Reassembling the EnclosureTo reassemble the Handheld first turn it off and unplug power, then remove the interconnecting cable and serial cable. Carefully fit the two halves together. If the halves are kept parallel as they are fit together the connector between the Processor Board and the Power Board will mate properly. Once the two halves are firmly pressed together you can reinstall the eight screws through the Handheld’s back, then replace the battery cover and reinstall its six screws. Why is there tape on the keypad?You can customize the graphic used over your keypad. The keypad includes a clear plastic overlay which forms a pocket into which you can place a paper graphic. When shipped from the factory, the keypad is loosely attached with tape to the enclosure; the adhesive on the back of the keypad is not used to securely fasten the keypad to the enclosure. This allows you to pull up the keypad and install your own custom graphic. Once you have finalized your keypad design, you can remove the backing on the keypad (exposing the adhesive) and permanently attach the keypad to the enclosure. If you need help setting up your serial port or the Mosaic Terminal for communications, please refer to Chapter 3, Your First Program. A Tour of the Processor BoardFigure 1‑2 shows a photo of the Processor Board, and diagrams the positions of the headers and jumpers.
Figure 1‑2 Headers and Jumpers on the Handheld’s Processor Board. The Communications Header Hosts Primary and Secondary Serial PortsThe primary serial port, designated Serial 1, can be configured for RS232 communication at standard rates up to 19,200 baud and nonstandard rates to 250,000 baud. The secondary serial port, Serial 2, which can be used for peripheral devices such as a printer or a barcode reader, has a maximum baud rate of 4800 baud. Both serial ports bring out their transmit and receive pins to the processor board’s communications header, H4. The primary serial port can be jumper configured for RS485 operation; in that case, the XCVR± pins are used. On the Personality Board the serial 1 lines can also be jumpered to the bottom-mounted DB25 connector. H4: Communications Header
Piezoelectric BeeperA piezoelectric beeper mounted on the Processor Board allows audio feedback for software events such as button presses or alarms. Chapter 8, Using the Keypad and Display, discusses using the beeper. Contrast PotThe contrast potentiometer (pot) adjusts the contrast of the monochrome LCD display and is located next to the Configuration Jumpers. The contrast of the display is properly set before each unit is shipped. If further adjustment is required, simply turn the pot with a small screwdriver. The contrast is also software adjustable. Please consult the demo program for an example of programmatically changing the contrast. Configuring Jumpers on the Processor BoardTable 1‑2 summarizes the purpose and default settings of each of the jumpers on the board. Table 1‑2 Processor Board Jumpers
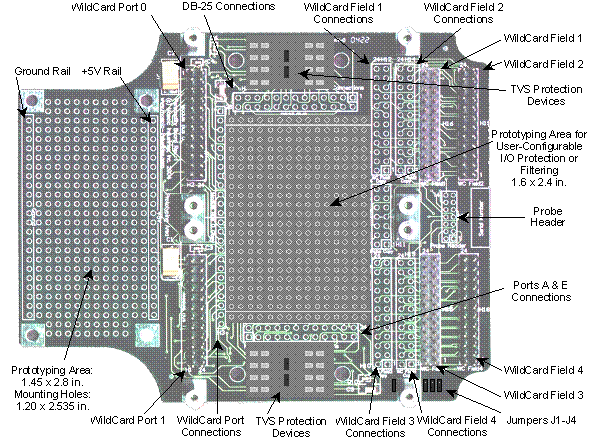
A Tour of the Personality BoardFigure 1‑3 Headers and Jumpers on the Handheld’s Personality Board. Figure 1‑3 shows prototyping areas on the left and in the middle for you to place custom circuitry if needed. Up to four WildCards stack on the Personality Board and ribbon cables connect their field headers to corresponding headers on the board. All headers are mirrored with their own sea of holes for point-to-point wiring. Any of the I/O signals from the WildCards or the Processor Board can be wired directly to the Handheld’s DB-25 connector, or they can be wired through filters, protection circuitry, or your own circuitry. On the center right of Figure 1‑3 of you can see an area for a probe. If you like, you can mount a probe on the center top of your Handheld and bring the signals through this connection. There are four jumpers on the Personality Board, described in Table 1‑3, useful while you are developing new software with the enclosure closed. Place jumpers at J1, J2 and J3 to route the serial line to the external DB25 connector, and place a jumper at J4 to route the cold reset line to the external connector. Table 1‑3 Personality Board Jumpers.
Wildcard I/O Expansion InterfaceThe Personality Board’s WildCard Port Headers allow you to mount up to four WildCards simultaneously. Port 0 allows two WildCards at module addresses 01, 02, or 03. The Handheld’s display and keypad use module number 0 so that kernel-resident software drivers can be used. Port 1 allows two WildCards at module addresses 04-07. The 24-pin stackable go-through WildCard headers provide the following signals: H2 and H3: WildCard Port Headers
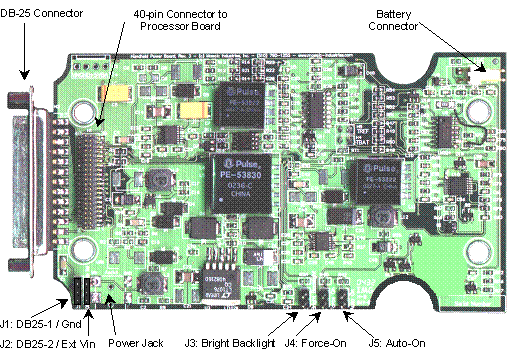
A Tour of the Power BoardThe Power Board contains high efficiency switching regulators to supply the various voltages required by the Handheld, as well as charging and battery management circuitry for the NiMH battery pack. Figure 1‑4 shows the positions of various jumpers and connectors on the Power Board. Several jumpers on the power board allow you to configure its operation as described in Table 1‑4. Table 1‑4 Power Board Jumpers
Figure 1‑4 Headers and Jumpers on the Handheld’s Power Board.
| |||||||||||||||||||||||||||||||||||||||||||||||||||||||||||||||||||||||||||||||||||||||||||||||||||||||||||||||||||||||||||||||||||||||||||||||||||||||||||||||||||||||||||||||||||||||||||||||||||||||||||||||||||||||||||||||||||||||||||||||||||||||||||||||||||||||||||||||||||||||||||||||||||||||||||||||||
Home|Site Map|Products|Manuals|Resources|Order|About Us
Copyright (c) 2012 Mosaic Industries, Inc.
Your source for single board computers, embedded controllers, and operator interfaces for instruments and automation