|
|
The EtherSmart Wildcard User GuideTable of ContentsSummary of EtherSmart Capabilities Connecting To the Wildcard Bus Selecting the Wildcard Address The EtherSmart Software Driver Routines EtherSmart Driver Data Structures EtherSmart Initialization, Configuration and Diagnostics Initializing Multiple EtherSmart Wildcards Code Downloads and Interactive Communications via Ethernet Serial Tunneling Buffer Management Functions Serial Tunneling Data Transmission and Reception Functions Serial Tunneling Connection Functions Serial Tunneling Inter-Task Service Management Functions Introduction to the Dynamic Webserver An Example of a Dynamic Web Page with a Remote Image Reference Serving Out a Stand-Alone Image Implementing a "Remote Front Panel" Using the Webserver Appendix A: Installing the Software Generating the EtherSmart Kernel Extension Library Creating Web Page and Image Resources with the Image Converter Loading the Software onto the Controller Using the EtherSmart Driver with C Using the Driver Code with Forth Appendix C: C Remote Front Panel Demo Program Appendix D: Forth Demo Program Appendix E: Forth Remote Front Panel Demo Program Appendix F: Browser Configuration Using Opera Is Highly Recommended Reconfiguring the Internet Explorer Browser Appendix G: Hardware Schematic (pdf) |
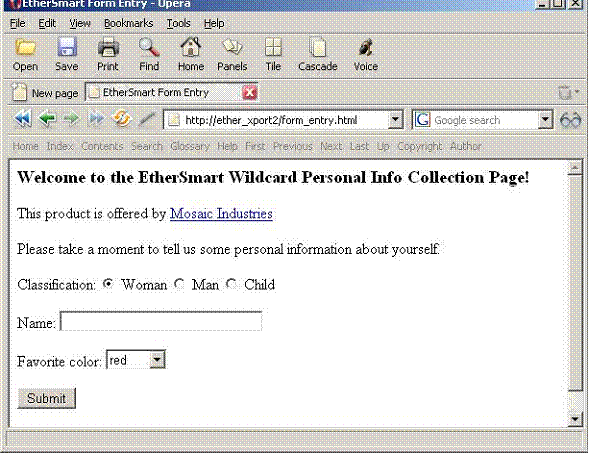
Web Form ProcessingIt is easy to create "forms" in HTML. Forms provide a way for a user to enter data in text boxes. They allow a user to select items from drop-down menus, radio button lists, or check boxes that are presented in the web browser window. The user’s selections are encoded as a set of "query fields" appended to the URL after a ? character. A set of pre-coded form processing functions in the EtherSmart driver enable the application program to parse the query fields, extract the data, and take actions based on the results. The demo program serves out a simple HTML form page as illustrated in Figure 1‑2. This page is served out by the Form_Entry_Page handler function whose source code is shown in Listing 1‑11. The form asks the user to select from radio buttons labeled "man", "woman" or "child", to type in their name, and to select their favorite color from a drop-down menu of colors "red", "blue", "yellow", or "green". Clicking the "Submit" button encodes the form results as a set of query fields appended to the form_response.cgi URL. This URL is handled by the Form_Response_Page function in Listing 1‑11. The .cgi file extension on the response URL refers to the "Common Gateway Interface" which deals with query fields. Note that the file names and extensions chosen for the URL are arbitrary (you can choose anything reasonable that you like), but it is a good idea to select file names and extensions that indicate the nature of the web service content or action. While the form shown in Figure 1‑2 is somewhat whimsical, it is meant to be suggestive of very useful capabilities. For example, your application could serve out a web form that asks the user to select a set of digital output channels and the corresponding values to which they should be set (high or low). The form could ask the user to specify a set of analog data acquisition channels, and the application program could respond by printing a table of the latest values for the specified channels. In other words, forms provide a means to instruct the application program to take specified actions, as well as a means to request specified data.
Figure 1‑2 Form entry web page served out by the EtherSmart Demo Program. Listing 1‑10 presents the HTML source text that generates the web page in Figure 1‑2. This page is compiled as a resource string by the image converter, resulting in constant definitions FORM_PAGE_HTML_XADDR and FORM_PAGE_HTML_SIZE that refer to the string. These constants are used in the Form_Entry_Page handler function that serves out the web page as shown in Listing 1‑11.
Listing 1‑10 Contents of the form_page.html Resource File. <html> <head><title>EtherSmart Form Entry</title></head> <body> <H3>Welcome to the EtherSmart Wildcard Personal Info Collection Page!</H3><p> This product is offered by <a href="http://www.mosaic-industries.com">Mosaic Industries</a> <p>Please take a moment to tell us some personal information about yourself.<p> <form method=GET action="/form_response.cgi"> Classification: <input type=radio checked name=classification value="woman"> Woman <input type=radio name=classification value="man"> Man <input type=radio name=classification value="child"> Child <p>Name: <input type=text name=name_id size=32 maxlength=80> <p>Favorite color: <select name=color size=1> <option>red <option>blue <option>yellow <option>green </select> <p><input type=submit> </form> <p> <a href="/index.html">Go back home</a><p></body></html> Listing 1‑10 provides an example of how to write the HTML code that generates a form web page. The <html> tag starts the file, and is balanced by the </html> tag at the end of the file. These tags tell the browser that the enclosed text is HTML. The <head> and </head> tags declare the HTML header area of the file. In the HTML header, the title of the web page is declared as "EtherSmart Form Entry". It is good practice to declare an informative title for each web page, as many browsers display the title. The <body> tag starts the displayed body of the web page in Listing 1‑10. The <H3> and </H3> tags declare the start and end of a heading style for the welcome message. The <p> tag means "start a new displayed paragraph" and results in the display of a blank line in the browser window; note that there is no </p> tag in HTML. The link to the Mosaic Industries web site is generated by the HTML <a> "anchor" tag, and the href keyword specifies the link destination:
<a href="http://www.mosaic-industries.com">Mosaic Industries</a> The start of the form portion of the page that is to be completed and submitted by the user is declared using the HTML code:
<form method=GET action="/form_response.cgi"> The "GET" method is the only method that is supported by the EtherSmart Wildcard. The action keyword declares the URL of the routine that responds to the form request. This URL invokes the Form_Response_Page function whose source code is presented in Listing 1‑11. The first part of the form declares a set of radio buttons. A radio button set allows only one of the choices to be active; use check boxes if you want the user to be able to select multiple items from a single set of options. Each radio button declaration is of the form:
<input type=radio name=classification value="man"> Man The name keyword declares the fieldname, and the value keyword specifies the value. The browser passes the fieldname followed by an = character followed by the selected value as part of the query field in the URL. Note that the text outside the <input > tag boundaries is simply HTML text that is displayed in the form. There is no requirement that the value field declared in the tag be identical to the displayed text. In this example, the value field and the displayed text differ only in their capitalization. The next portion of the form declares a textbox using the line:
<p>Name: <input type=text name=name_id size=32 maxlength=80> This declares a textbox 32 characters wide, with a maximum number of 80 characters accepted; the textbox scrolls if the number of characters exceeds 32. The fieldname is name_id, and the field value will equal the contents typed in by the user. There are some subtleties, though. The HTTP standard requires that certain characters may not be included in a URL and must be "escaped" by encoding the character as %hexhex, where hexhex represents the two hexadecimal characters that specify the ASCII value of the desired character. In addition, the browser converts each space character (ASCII 0x20) into the + character. The following is a minimal list of characters that are escaped by the browser:
; / ? : @ = & < > " # % { } | \ ^ ~ [ ] ‘ To make it easy to deal with this situation, the EtherSmart driver contains the HTTP_Unescape and HTTP_Plus_To_Space functions that make it easy to recover the original text as typed by the user. The next part of the form in Listing 1‑10 is a drop-down menu that is started with the tag:
<select name=color size=1> The name keyword defines the fieldname, and the size keyword specifies how many items are visible at one time to the user. The optional multiple keyword, if included in the select tag, allows the user to select more than one option. The form is ended with the tags:
<input type=submit></form> When the user clicks the "Submit" button, the selected choices are encoded as query fields appended to the URL. For example, if the user selects "man" as the classification, types "Randy Newman!" in the name box, and chooses "yellow" as the favorite color, the following URL is sent by the browser to the EtherSmart:
/form_response.cgi?classification=man&name_id=Randy+Newman%21&color=yellow This URL illustrates how the query fields are formatted by the browser. The query fields start with the ? character, and each subsequent field is separated by the & delimiter. Within each field is the fieldname followed by the = character, followed by the value field. Note that the exclamation point after the name is escaped as %21, and the space between "Randy" and "Newman" is converted to a plus sign in the URL. The Form_Response_Page function calls HTTP_Unescape and HTTP_Plus_To_Space to process the URL query fields and recover the original text as typed by the user. This URL invokes the Form_Response_Page function in Listing 1‑11 which parses the query fields following the ? character in the URL, and serves out a response page. For the URL shown above, the response presented in the web browser looks like this: Thanks for your response! It must be great to be a man with a name like Randy Newman! . It's good to hear that yellow is your favorite color! Table 1‑13 presents the pre-coded EtherSmart form processing functions that are used to parse and respond to the query fields in the URL. HTTP_Parse_URL is automatically called by the webserver and is typically not directly called by the programmer. It sets up the initial parsing pointers to point to the first query field (if present) in the URL. HTTP_Parse_URL initializes the HTTP_URL_Ptr to return the xaddress of the start of the URL in the HTTP_Inbuf. It sets the HTTP_URL_Base_Count to equal the number of characters before the start of the query field, and sets the HTTP_URL_Full_Count to the total number of characters in the URL. If there is no query field, then the HTTP_URL_Base_Count equals the HTTP_URL_Full_Count. The HTTP_Fieldname_Ptr and HTTP_Fieldname_Count return the xaddress and count, respectively, of the next fieldname. In the example URL, the first fieldname is classification and its count is 14 (the number of characters in classification). The HTTP_Value_Ptr and HTTP_Value_Count return the xaddress and count, respectively, of the next value which appears after the = character. In the example URL above, the first value is man and its count is 3 (the number of characters in man). Table 1‑13 HTTP Form Processing Functions.
To see an example of how these form processing functions work, we can take a close look at the source code of the Form_Response_Page function in Listing 1‑11. As usual, we first define and load a set of local variables to avoid nesting of operating system function calls. These local variables capture the starting values of the return values for the HTTP_Outbuf, HTTP_Outbufsize, HTTP_Value_Ptr, and HTTP_Value_Count for the specified modulenum. The standard procedure for HTTP header generation is followed, invoking HTTP_Put_Header, HTTP_Put_Content_Type, and HTTP_Send_LBuffer to send the HTTP header, declaring the content as static HTML text. Then HTTP_Send_Buffer is used to send the form_response_str, with the STRING_XADDR macro used in the standard fashion to convert the string base address to a 32-bit xaddress, with strlen providing the string count. At this point, the Form_Response_Page function has served out the HTTP header and displayed the string: Thanks for your response! It must be great to be a Next, Store_Int is invoked by Form_Response_Page to zero the 16-bit count at the start of the HTTP_Outbuf, thereby starting a new string in the LBuffer. If the first value was entered by the user (that is, if it has a non-zero count), the value is appended to the HTTP_Outbuf. Otherwise, the neutral classification string "person" is added to the buffer using HTTP_Outbuf_Cat. This completes the processing of the man/woman/child part of the form. HTTP_To_Next_Field is called by Form_Response_Page to advance to the name_id field associated with the textbox, and the return values of HTTP_Value_Ptr and HTTP_Value_Count are stored in the local variables. Then, to avoid confusing the parsing routines when HTTP_Unescape is called, HTTP_To_Next_Field is called again to advance to the color field. Then the HTTP_Value_Ptr and HTTP_Value_Count return values are stored in the next_http_value_ptr and next_http_value_count variables. This technique protects us against a situation in which the user types any of the query field delimiters such as & or = as part of the name entered into the textbox. When we unescape the textbox string, these delimiters would appear in the URL and confuse the parsing routines. We "look ahead" to avoid this problem. If the user entered a name in the textbox, Form_Response_Page calls HTTP_Plus_To_Space and HTTP_Unescape to convert the text in the URL back into the characters that the user typed. In the example URL above, these steps deal with the + between "Randy" and "Newman", and recover the ! character that the user typed. Note that we capture the count returned by HTTP_Unescape, as this routine shortens the textbox substring by two characters for each escape sequence that it processes. If the user did not enter anything in the textbox, then we add the neutral term "yours" to the HTTP_Outbuf using HTTP_Outbuf_Cat. The next few lines in the Form_Response_Page function add the favorite color string to the HTTP_Outbuf using HTTP_Outbuf_Cat. A line of text containing the ending tags </body></html> is added to the HTTP_Outbuf, and the contents of HTTP_Outbuf are sent to the browser using HTTP_Send_LBuffer. This completes the form response, and the browser displays a message that summarizes the form entries that were made. While this example is purely text-based in its response, keep in mind that the same coding techniques can be applied to instruct the Mosaic controller to perform sophisticated data acquisition, control, and status reporting in response to the inputs received via a web form.
Listing 1‑11 Form Processing Web Request and Response Pages. // form_response page strings:
char* form_response_str = "<html><head><title>Form Response</title></head><body>\r\n\ <H3>Thanks for your response!</H3><p><p>It must be great to be a ";
char* person_str = "person"; char* name_announce_str = " with a name like "; char* yours_str = "yours"; char* good_to_hear_str = ". It’s good to hear that "; char* rainbow_str = "rainbow"; char* favorite_str = " is your favorite color!</body></html>"; // note: in form_page_str, we mark one of the radio buttons as checked; otherwise, // the browser can skip the field entirely, // then we would have to match the fieldnames!
void Form_Entry_Page( int modulenum ) // responds to url= /form_entry.html // places FORM_TEXT into the buffer as a longstring after the http header. // we send directly from compiled string in flash to avoid copy into ether_out buffer; // this method is ideal for serving static text. { xaddr http_outbuf_base = HTTP_Outbuf(modulenum); uint http_outbuf_size = HTTP_Outbufsize(modulenum); HTTP_Put_Header(http_outbuf_base, http_outbuf_size); // http header->outbuf HTTP_Put_Content_Type(http_outbuf_base, http_outbuf_size,0, HTTP_TEXT_HTML_CONTENT); // params: xlbuf,maxbufsize,dynamic?,content_type // static text/html content ->outbuf;header is done HTTP_Send_LBuffer(http_outbuf_base, modulenum); // send out header, ignore #bytes_sent HTTP_Send_Buffer(FORM_PAGE_HTML_XADDR, FORM_PAGE_HTML_SIZE, modulenum); } // send form_page.html, ignore #bytes_sent
void Form_Response_Page ( int modulenum ) // this is the handler function that responds to url= /form_response.cgi // incoming request from browser looks like this: // GET /form_response.cgi?classification=<man/woman/child>&name_id=<namestring> // &color=<red/blue/yellow/green> // We respond: // It must be great to be a <man/woman/child/person> // with a name like <namestring/yours>. // It’s good to hear that <red/blue/yellow/green/rainbow> is your favorite color. { xaddr http_outbuf_base = HTTP_Outbuf(modulenum); uint http_outbuf_size = HTTP_Outbufsize(modulenum); xaddr http_value_ptr = HTTP_Value_Ptr(modulenum); // load value,cnt for 1st field uint http_value_count = HTTP_Value_Count(modulenum); xaddr next_http_value_ptr; // used for look-ahead field to avoid unescape problems uint next_http_value_count;// used for look-ahead field to avoid unescape problems HTTP_Put_Header(http_outbuf_base, http_outbuf_size); // http header->outbuf HTTP_Put_Content_Type(http_outbuf_base, http_outbuf_size,0, HTTP_TEXT_HTML_CONTENT); // params: xlbuf,maxbufsize,dynamic?,content_type // static text/html content ->outbuf;header is done HTTP_Send_LBuffer(http_outbuf_base, modulenum); // send out header, ignore #bytes_sent HTTP_Send_Buffer(STRING_XADDR(form_response_str), strlen(form_response_str), modulenum); // send form_response_str, ignore #bytes_sent StoreInt(0, http_outbuf_base); // reset lcount to start fresh in buffer if(http_value_count) // if first field was entered, add it to response HTTP_Outbuf_Cat(http_value_ptr, http_value_count, modulenum); else // else add "person" to response HTTP_Outbuf_Cat(STRING_XADDR(person_str), strlen(person_str), modulenum); HTTP_Outbuf_Cat(STRING_XADDR(name_announce_str), strlen(name_announce_str), modulenum); // add " with a name like " to response HTTP_To_Next_Field(modulenum); // go to name_id field, ignore #chars_advanced http_value_ptr = HTTP_Value_Ptr(modulenum); // load value,cnt for name_id field http_value_count = HTTP_Value_Count(modulenum); HTTP_To_Next_Field(modulenum); // go to color field, ignore #chars_advanced next_http_value_ptr = HTTP_Value_Ptr(modulenum);// load value,cnt for color field next_http_value_count = HTTP_Value_Count(modulenum); if(http_value_count) // if a name was entered, process it and add it to response { HTTP_Plus_To_Space(http_value_ptr, http_value_count); // get rid of + in name http_value_count = HTTP_Unescape(http_value_ptr, http_value_count); HTTP_Outbuf_Cat(http_value_ptr, http_value_count, modulenum); } else // else add "yours" to response HTTP_Outbuf_Cat(STRING_XADDR(yours_str), strlen(yours_str), modulenum); HTTP_Outbuf_Cat(STRING_XADDR(good_to_hear_str), strlen(good_to_hear_str), modulenum); // add ". It’s good to hear that " to response if(next_http_value_count) // if color field was entered, add it to response HTTP_Outbuf_Cat(next_http_value_ptr, next_http_value_count, modulenum); else // else add "rainbow" to response HTTP_Outbuf_Cat(STRING_XADDR(rainbow_str), strlen(rainbow_str), modulenum); HTTP_Outbuf_Cat(STRING_XADDR(favorite_str), strlen(favorite_str), modulenum); // add " is your favorite color!</body></html>" to response HTTP_Send_LBuffer( http_outbuf_base, modulenum); } // send response, ignore #bytes_sent
HTTP Inter-Task Service Management FunctionsThe service management functions that run the webserver are the same as those described in the section titled "Serial Tunneling Inter-Task Service Management Functions"; they are listed in Table 1‑8. Unlike the other services that have been discussed such as serial tunneling and email, the web service is performed autonomously by the Ethernet task. After the handlers are posted to the Autoserve Array, non-GUI web service requests are handled by the Ethernet task with no intervention by the application task. The only exception is the implementation of a GUI (Graphical User Interface) "remote front panel" feature which must be synchronized to the application task as discussed in a later section. An Example of a Dynamic Web Page with a Remote Image ReferenceThe EtherSmart home page as it appears in a browser is shown in Figure 1‑3. It presents some welcoming and explanatory text, provides a link to the form page discussed in the prior section, and invites the user to link to a stand-alone image as discussed in the next section. The home page presents a link to the Mosaic Industries website at www-mosaic-industries.com, and displays an image that is hosted by the Mosaic site. It invites the user to link to the Opera browser website at www.opera.com, and links to an informative page that describes the advantages of Opera and tells how to configure it for use with the EtherSmart Wildcard. It recommends the use of the Putty Ethernet terminal program for serial tunneling and interactive Ethernet communications with the EtherSmart Wildcard. Finally, it displays a dynamically generated elapsed time since system initialization. It is easy to implement these features using HTML and a bit of software. Listing 1‑12 shows the HTML source code that generates the home page. This HTML file is processed as a resource by the Image Converter program as explained above and in Appendix A. Many of the HTML tags in this file have already been discussed in earlier sections, including the following tags:
<html> </html> <head> </head> <title> </title> <H3> </H3> <p> The link to the form entry page is coded as follows:
While this simple <a href="/form_entry.html">form example</a> summarizes This uses the standard <a> </a> "anchor" tags, with the href keyword specifying the target URL, and the remaining text inside the tag specifying the link text displayed by the browser ("form example" in this case). A similar link to the stand-alone logo image is served out by the following HTML: The EtherSmart webserver can serve out a stand-alone image like <a href="/logo_response.png">this one</a>. This anchor invokes the /logo_response.png URL; recall that PNG is a convenient public domain image compression format. The Logo_Response_Page function that is associated with this URL is described in the next section.
Figure 1‑3 EtherSmart home page as seen in the browser window.
The following HTML presents a link to the Mosaic Industries website, and displays a picture: It is also easy to serve out images that reside on other servers by simply including a reference to the image in your HTML code. The following picture is an example; it is hosted by Mosaic's website at <a href="http://www.mosaic-industries.com">www.mosaic-industries.com</a>: <p><img src="http://www.mosaic-industries.com/ESmart_Images/webbanner_logo1.jpg"> The link to the Mosaic Industries website uses the standard anchor tag syntax as described above. The <img> tag refers to the image called webbanner_logo1.jpg which resides on the Mosaic Industries website. While the home page text in Figure 1‑3 image is served directly by the EtherSmart Wildcard, the displayed image actually comes from another webserver. You can use this technique to serve large, colorful images without burdening the embedded controller itself. This technique uses the power of the Internet to enhance the visual appeal of web pages served by the EtherSmart Wildcard.
Listing 1‑12 Contents of home_body.html Resource File. <html><head><title>EtherSmart Wildcard Home Page</title></head><body> <H3>Welcome to the EtherSmart Wildcard Home Page!</H3><p> <H4>Congratulations!</H4><p> Viewing this page from your browser means that you have established communications with the EtherSmart Wildcard's dynamic webserver. This webserver lets you serve static (pre-specified) and dynamic (programmable on the fly) text, data, and images from your instrument. The EtherSmart User Guide explains how to set up your instrument's website: for each web page URL (webpage address string), simply program a handler function. The webserver will automatically invoke the correct handler when a browser requests a URL. <p> You can program HTML forms to send data to the EtherSmart Wildcard. While this simple <a href="/form_entry.html">form example</a> summarizes and echoes back the form data, it is easy to program more meaningful applications. For example, you could use a form to request that data be sampled from specified A/D channels at a specified frequency. <p> The EtherSmart webserver can serve out a stand-alone image like <a href="/logo_response.png">this one</a>. <p> It is also easy to serve out images that reside on other servers by simply including a reference to the image in your HTML code. The following picture is an example; it is hosted by Mosaic's website at <a href="http://www.mosaic-industries.com">www.mosaic-industries.com</a>: <p><img src="http://www.mosaic-industries.com/ESmart_Images/webbanner_logo1.jpg"> <p> To serve out an image that is hosted by the EtherSmart Wildcard itself, and that is part of a page that contains other text, you'll need a specially configured browser as explained in the EtherSmart User Guide. We strongly recommend that you download the free <a href="http://www.opera.com">Opera</a> browser. There's more information <a href="/opera_configuration.html">here</a> about how to configure Opera for trouble-free use with the EtherSmart Wildcard. <p> To test interactive Serial Tunneling (serial communications via the EtherSmart), we recommend the Putty free ethernet terminal. To get it, simply type <b>Putty</b> into Google, and download the small program from one of the resulting links. See the EtherSmart User Guide for examples of use. <p> As a demonstration of serving out dynamic web content that changes over time, this home page reports the time since the EtherSmart was initialized:<p>
Listing 1‑13 presents the source code that serves out the EtherSmart home page. Most of the code follows the procedures outlined in earlier sections, capturing the buffer xaddress and count into local variables, serving the HTTP header using HTTP_Put_Header, HTTP_Put_Content_Type and HTTP_Send_LBuffer. The unique aspect of this web page is that it inserts dynamically generated data in the form of the elapsed time since system initialization. The ReadElapsedSeconds function returns a 32-bit time count that is captured into the elapsed_sec variable. Then the standard sprintf C function is invoked in the argument list of HTTP_Outbuf_Cat to convert the time to a string and append it to the HTTP_Outbuf buffer. HTTP_Send_LBuffer serves out the dynamically generated elapsed time to the browser. This is a simple example of dynamically generated web content. Using these techniques, your application can dynamically display the status of your instrument to a remote operator via the web. Listing 1‑13 Dynamic Web Page Source Code. void Home_Page( int modulenum ) // this is the handler function for the /index.html and the / URLs. // sends the http header with dynamic (because of changing time stamp) text/html // content type, followed by home_body_str text and the elapsed seconds since the // system was initialized. { ulong elapsed_sec; xaddr http_outbuf_base = HTTP_Outbuf(modulenum); uint http_outbuf_size = HTTP_Outbufsize(modulenum); HTTP_Put_Header(http_outbuf_base, http_outbuf_size); // http header->outbuf HTTP_Put_Content_Type(http_outbuf_base, http_outbuf_size, 1, HTTP_TEXT_HTML_CONTENT); // params: xlbuf,maxbufsize,dynamic?,content_type // dynamic text/html content ->outbuf;header is done HTTP_Send_LBuffer(http_outbuf_base, modulenum); // send out header, ignore #bytes_sent HTTP_Send_Buffer(HOME_BODY_HTML_XADDR, HOME_BODY_HTML_SIZE, modulenum); // send home_body.html, ignore #bytes_sent StoreInt(0, http_outbuf_base); // reset lcount to start fresh in buffer elapsed_sec = ReadElapsedSeconds(); // get elapsed time, used by sprintf... HTTP_Outbuf_Cat((xaddr) seconds_str, (int) sprintf(seconds_str,"%ld",elapsed_sec),modulenum); // params: xstring_to_add,cnt_to_add,module // convert seconds to string, add line & crlf to longstring, update lcnt HTTP_Outbuf_Cat(STRING_XADDR(time_announce_str), strlen(time_announce_str), modulenum); // add to lbuffer: " seconds since system initialization.</body></html>" HTTP_Send_LBuffer( http_outbuf_base, modulenum); } // send elapsed time, ignore #bytes_sent
Serving Out a Stand-Alone ImageThe EtherSmart home page provides a link to the /logo_response.png URL, a stand-alone image of the Mosaic Logo. The logo image is in a file named mosaic_logo.png, and the Image Converter program converts it into a resource specified by the constants MOSAIC_LOGO_PNG_XADDR and MOSAIC_LOGO_PNG_SIZE. The handler for this URL is the Logo_Reponse_Page function shown in Listing 1‑14. Because the web page contains only one type of data (in this case, a PNG image), it can be properly rendered by any browser in the browser’s default configuration. The response function shown in Listing 1‑14 is simple. After capturing the HTTP_Outbuf and HTTP_Outbufsize return results in local variables, HTTP_Put_Header and HTTP_Put_Content_Type are called to create the header. The content type is specified by the constant HTTP_IMAGE_PNG_CONTENT, and the image is declared as static because it does not change over time. The size of the HTTP header is retrieved out of the first 16 bits of the HTTP_Outbuf by the Fetch_Int function; recall that because the buffer is in paged memory, the paged fetch operator must be used. Then the convenient HTTP_Send_2Buffers function is invoked to send first the HTTP header and then the logo image. Note that the starting xaddress of the HTTP header is specified by http_outbuf_base+2, as the first 2 bytes of this LBuffer contain the number of bytes stored. The MOSAIC_LOGO_PNG_XADDR and MOSAIC_LOGO_PNG_SIZE constants specify the logo image data that comprises the content of the served page. Listing 1‑14 Handler Function that Serves Out an Image. void Logo_Response_Page ( int modulenum ) // this is the handler function that responds to url= /logo_response.png // assumes that logo.s2 has been loaded into memory. serves it as static image. { xaddr http_outbuf_base = HTTP_Outbuf(modulenum); uint http_outbuf_size = HTTP_Outbufsize(modulenum); int http_header_size; HTTP_Put_Header(http_outbuf_base, http_outbuf_size); // http header->outbuf HTTP_Put_Content_Type(http_outbuf_base, http_outbuf_size,0, HTTP_IMAGE_PNG_CONTENT); // params: xlbuf,maxbufsize,dynamic?,content_type // static png image type->outbuf, cnt in first 2bytes; header’s done http_header_size = FetchInt(http_outbuf_base); // get size of http header HTTP_Send_2Buffers(http_outbuf_base+2, http_header_size, MOSAIC_LOGO_PNG_XADDR, MOSAIC_LOGO_PNG_SIZE, modulenum); // params: xbuf1,cnt1,xbuf2,count2,modulenum } // send header&image, ignore numbytes_sent
Initializing the Demonstration ProgramListing 1‑15 shows the two high level startup functions of the Demo program. Web_Demo calls Ether_Task_Setup_Default, the highest level initialization function. This allocates and defines the required data structures, and starts the Ethernet task. Web_Demo then invokes Web_Handler_Installation which was discussed in the Section titled "Web Handlers Are Posted to the Autoserve Array". The main function is defined as a synonym for Web_Demo. You can run the demonstration program by compiling it and loading it as described in Appendix A, and then typing main at the QED Terminal. As described in earlier sections, you can interactively type the following commands after executing main:
Ether_Task_Setup_Default( ) // full initialization Ether_Set_Defaults( ) // sets mosaic factory defaults; returns error code Ether_Set_Local_IP( int my_ip1, int my_ip2, int my_ip3, int my_ip4 ) // sets IP Ether_IP_Report( ) // summarizes the IP address, gateway address, and netmask. Ether_Ping( int remote_ip1, int ip2, int ip3, int ip4) // prints ping report Ether_Monitor_Demo( int modulenum ) // runs interactive monitor on modulenum Tunnel_Test( ) // waits for incoming connection via Putty or other Ether terminal Email_Test( ) // sends a test email; you must edit function’s source code first Recall that when interactively typing these commands, there is no space between the function name and the ( character, and there must be at least one space after the ( character. All of these functions have been described in the text of this document. Listing 1‑15 High Level Initialization Functions in the Demo Program. void Web_Demo( void ) // call this after Ether_Task_Setup_Default point browser to raw ip or to // ip/index.html to see the home web page. urls are case sensitive. // any other url’s serve out: page not found. // returns nonzero error if too many handlers were added // (limited by AUTOSERVE_DEFAULT_ROWS passed to ether_init) { Ether_Task_Setup_Default(); Web_Handler_Installation(E_MODULENUM); // ignore too_many_handlers? flag }
void main( void ) { Web_Demo(); }
|
Home|Site Map|Products|Manuals|Resources|Order|About Us
Copyright (c) 2006 Mosaic Industries, Inc.
Your source for single board computers, embedded controllers, and operator interfaces for instruments and automation