|
|
The EtherSmart Wildcard User GuideTable of ContentsSummary of EtherSmart Capabilities Connecting To the Wildcard Bus Selecting the Wildcard Address The EtherSmart Software Driver Routines EtherSmart Driver Data Structures EtherSmart Initialization, Configuration and Diagnostics Initializing Multiple EtherSmart Wildcards Code Downloads and Interactive Communications via Ethernet Serial Tunneling Buffer Management Functions Serial Tunneling Data Transmission and Reception Functions Serial Tunneling Connection Functions Serial Tunneling Inter-Task Service Management Functions Introduction to the Dynamic Webserver An Example of a Dynamic Web Page with a Remote Image Reference Serving Out a Stand-Alone Image Implementing a "Remote Front Panel" Using the Webserver Appendix A: Installing the Software Generating the EtherSmart Kernel Extension Library Creating Web Page and Image Resources with the Image Converter Loading the Software onto the Controller Using the EtherSmart Driver with C Using the Driver Code with Forth Appendix C: C Remote Front Panel Demo Program Appendix D: Forth Demo Program Appendix E: Forth Remote Front Panel Demo Program Appendix F: Browser Configuration Using Opera Is Highly Recommended Reconfiguring the Internet Explorer Browser Appendix G: Hardware Schematic (pdf) |
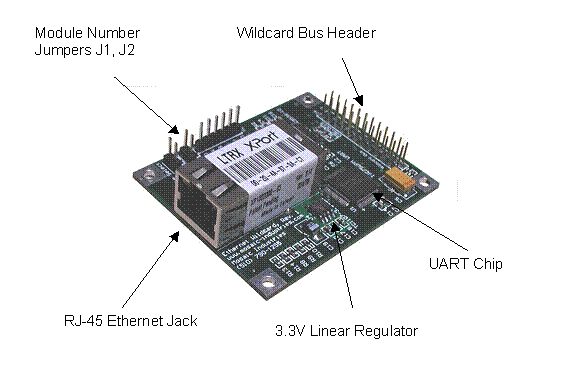
EtherSmart Wildcard HardwareFigure 1‑1 illustrates the hardware on the EtherSmart Wildcard. The large component is the XPort from Lantronix, providing an Ethernet co-processor and network interface built into an RJ-45 connector housing. An Ethernet extension cable is available from Mosaic if you need to bring the female RJ-45 jack out to a panel connection on the front or back of your instrument. A small linear regulator on the Wildcard converts the 5 volt power on the Wildcard bus to the 3.3V supply required by the XPort. The XPort draws about 250 mA of current. The regulator can be shut down under program control while the XPort is not in use to save 1.25 Watts of power. The XPort exchanges data via a serial interface, while the Wildcard bus is a parallel interface. A UART (Universal Asynchronous Receiver/Transmitter) chip on the EtherSmart board implements the conversion between the parallel Wildcard bus and the XPort’s serial data lines. The UART contains two 64-byte FIFO (First In/First Out) buffers, one for incoming data, and one for outgoing data. The XPort and the UART "handshake" with one another using "Ready to Send" (RTS) and "Clear to Send" (CTS) hardware lines. This scheme ensures that no data is lost due to buffer overflow in the UART or the XPort: the sending device stops transmitting until the receiving device indicates that there is room in its buffer for more data.
Figure 1‑1 The EtherSmart Wildcard. Connecting To the Wildcard BusThe 24-pin Wildcard bus header interfaces to the host processor (QCard, QScreen, QVGA Board, Handheld, or PDQ series controller). To connect the EtherSmart Wildcard to the Wildcard bus on the controller board, follow these simple steps. With the power off, connect the female 24-pin side of the stacking go-through Wildcard bus header on the bottom of the EtherSmart Wildcard to Module Port 0 or Module Port 1 on the controller (or its mating PowerDock). The corner mounting holes on the Wildcard must line up with the standoffs on the mating board. The module ports are labeled on the silkscreen of the controller board. Note that the EtherSmart Wildcard headers are configured to allow direct stacking onto the controller board, even if other Wildcards are also installed. Do not use ribbon cables to connect the Wildcard to the bus. CAUTION: The Wildcard bus does not have keyed connectors. Be sure to insert the module so that all pins are connected. The Wildcard bus and the EtherSmart Wildcard can be permanently damaged if the connection is done incorrectly. Selecting the Wildcard AddressOnce you have connected the EtherSmart Wildcard to the Wildcard bus, you must set the address of the module using jumper shunts across J1 and J2. The Wildcard Select Jumpers, labeled J1 and J2, select a 2-bit code that sets a unique address on the module port of the controller board. Each module port on the controller accommodates up to 4 Wildcards. Wildcard Port 0 provides access to Wildcards 0-3 while Wildcard Port 1 provides access to Wildcards 4-7. Two Wildcards on the same port cannot have the same address (jumper settings). Table 1-1 shows the possible jumper settings and the corresponding addresses. Table 1‑2 Jumper Settings and Associated Addresses.
The Wildcard address is called the “module number” or simply “modulenum” in the input parameter lists of the software driver functions. Most of the driver functions require that the modulenum be passed as a parameter. Make sure that the jumper settings on the Wildcard hardware match the modulenum parameter that is specified in the application software. |
Home|Site Map|Products|Manuals|Resources|Order|About Us
Copyright (c) 2006 Mosaic Industries, Inc.
Your source for single board computers, embedded controllers, and operator interfaces for instruments and automation